Friday, 2 November 2012

exploring Antiquity

I am a lucky man. My wife Michelle has played four games of Antiquity with me so far (and also 55 games of Through the Ages in the past). One reason that I bought Antiquity was I hoped it would be a game I could play as a 2P game with her, so - mission accomplished! I was a little nervous about teaching her the game at first. Afterall this is one very merciless game system. The game punishes you much more than your opponents do. She did well enough, and even beat me in 3 of 4 games. I can say it's partly because she only picks San Christofoni as her patron saint, which she finds easiest to play, and I keep trying different patron saints (and usually failing to play them effectively). But when I look at how spectacularly I failed, I think a big part of the failure lies with me and not with my adventurous approach.

I should have learnt a lot from my mistakes. Famine is the biggest threat. It increases every round, and it increases whenever anyone discovers a food resource in the wild using an Explorer. If you don't have enough food, you earn graves for your cities. You need to stockpile food to stay afloat, and you need to win the game before you are overwhelmed by the famine level. I keep making the same mistake of not producing or stockpiling enough food. Another mistake is failing to plan ahead for my second city. I sometimes wait until it's too late to prepare for my second city, e.g. when my first city is already full and my building resources are rotting away. Yet another mistake is not having a clear strategy that fits my chosen patron saint. You don't have much space in your cities (especially when you keep having to dig graves!), so you need to be picky about which buildings to have. I find that I sometimes construct buildings on a whim, depending on what looks attractive at the time, without making sure that they really do fit well into a coherent strategy. The result is I end up having to scramble to build a second city to have more space for other buildings I desperately need.

In contrast, Michelle by now has a pretty well-tuned San Christofoni strategy. It's almost a formula. She builds a stone mine in round one, and uses the stone mined to build her cathedral in round two, to be dedicated to San Christofoni. She doesn't build a Store because by round two she will have infinite storage. She likes the Market, which lets her exchange for goods types she doesn't have. She likes the Faculty of Alchemy too, which does clean-up and allows her to reuse land and lakes.

No matter which patron saint you pick, you need to have a clear strategy so that you can progress towards the victory condition efficiently, i.e. before famine destroys you. Despite the many spectacular failures, I am enjoying this journey of discovery. I may not have discovered the best ways to play each patron saint, but I do have some rough ideas on what to try next time, and I do know what I should not do (I just hope I remember them next time I play).

One worry I have about Antiquity is the replayability. The game is quite solitairish for about the first half of the game, and it can feel like an efficiency contest with little you can do to affect your opponents (like swimming?). Only in the second half when players' zones of control start overlapping will there be some player interaction, like dumping rubbish in your opponent's forests, peeing in his ponds. If there are more or less ideal approaches to play each patron saint, then the game may become rather formulaic. At the start of the game you check out the landscape, decide on a patron saint, construct a blueprint in your mind, and then just execute based on that blueprint, with some adjustments in the second half of the game as you come into contact with your opponents. I don't know whether this will be the final conclusion after I master all the patron saints. My worry may turn out to be unfounded. Even if my worry turns out to be true, I would have spent many games reaching that conclusion, and by then I would have already gained my money's worth. I think even after that Antiquity will still be an enjoyable game to bring out once in a while to exercise my brain.

The predetermined blueprint worry is the problem I have with the solitaire version of Town Center. It is why I am only interested to play multiplayer Town Center now.

I recently played The Great Zimbabwe (also by Splotter Spellen) and enjoyed myself a lot. It has much more player interaction than Antiquity, and it made me think about the multiplayer solitaire characteristic of the early game in Antiquity. Splotter is becoming one of my favourite publishers. I enjoy many of the games designed by the design team of Jeroen Doumen and Joris Wiersinga. The games are intricate, merciless and unapologetic. You need to know the game well to play half decently. I would even argue that the games have player elimination, because if you don't know what you're doing, you can easily doom yourself in the first few turns. I think this has happened to me in every single Splotter game. It was what scarred me on Greed Incorporated. It recently happened to me in The Great Zimbabwe. I find Splotter games very unique. There are many other long and complex Eurogames, but Splotter games have a signature that sets them apart. I find that there are always big-stroke strategies which if your opponents do not know how to counter, will let you trample over them. The games are not about doing many small things efficiently and making many clever tactical choices. They are about crucial moments that make or break you. You need to learn to spot such moments, to grab the opportunities and to avoid the pitfalls.

These four recent games of Antiquity against Michelle made me think about how gamers should be gaming. This may actually be the best way to game - to apply the Game of the Month concept. Pick a game with good depth, and play it many times to fully appreciate it, before moving on to the next good game. Skipping some good games is a worthwhile sacrifice. It is better to fully appreciate one good game than to have brief introductions to five good games, right? Well, it's easier said than done. Many boardgame hobbyists tend to get easily distracted by the next shiny new game. Aaah... the bane of our lives.

21 Oct 2012. This was my third game and Michelle's second. It was the second time we played against each other. I picked Santa Barbara this game. The privilege is being able to rearrange buildings, and the victory condition is to construct every building type. I build a large Store (bottom left) which let me store many food resources.

I won this game. I needed a third city in order to have enough space for all my buildings. I was probably lucky in this game. Michelle had forgotten about a particular goods type. If she had been more careful and had planned better, she might have reached her victory condition (collecting 3 each of the 8 types of food and luxury resources) sooner.

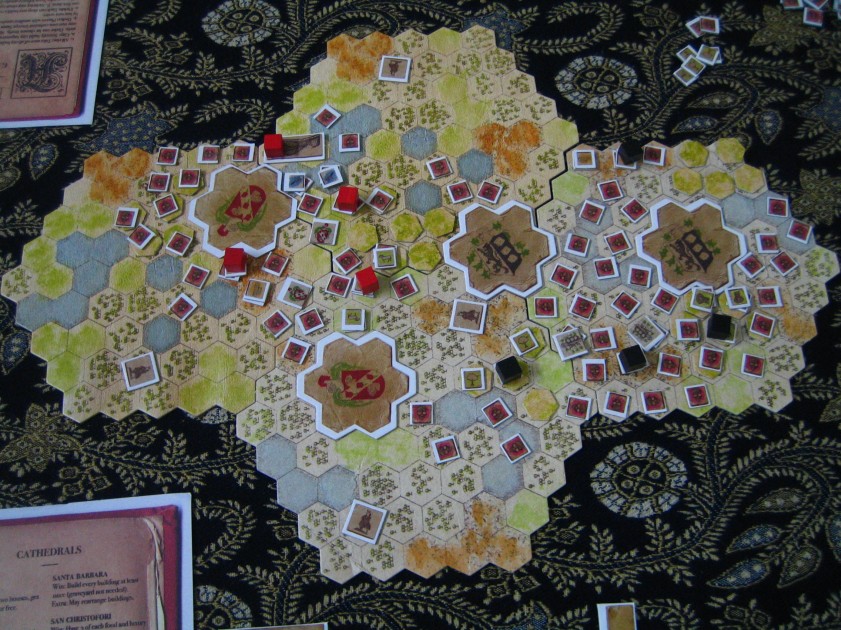
The main gameboard. I (black) tend to like harbours so my cities tend to be next to lakes.

27 Oct 2012. Our 3rd game. This time I picked San Nicolo, privilege is "buy 1 free 1" (ask a Malaysian) when building a house, victory condition is to build all 20 houses. At this point I had actually built a harbour at the right edge of the city, but it was now covered by graves.

The main gameboard. I (black) was a little slow in building my second city near the centre.

Once my second city was ready, I hurriedly built a Hospital to remove graves and a Faculty of Alchemy to clean land. I was close to suffocating by then. I also built a Faculty of Philosophy to let me ignore the variety requirement when building houses. The more expensive houses always require food and luxury items of different types, which is a hassle to collect. So the Faculty of Philosophy is very useful for the San Nicolo player.

These were Michelle's cities. She rarely bothers to build Fountains (not a single one in sight), which reduces the Famine level by one and also reduces pollution. She doesn't need them as much as I usually do. So I end up building lots of them, which helps her to some extent.

By game end, she had only used 5 squares in her second city. She likes the Market because she can use it to swap two goods for one of any type. She plans which buildings to construct much better than I do. Very little waste.

In contrast, my cities were a mess. 13 graves, and this was after I had already removed some using the Hospital. I still had 7 houses to go, which was still a long way away.

28 Oct 2012. A second game of Antiquity over the same weekend! Woohoo! This time I used yellow, hoping it would be more auspicious than black. It didn't work, but the blame was on me, not the colour. This time I picked San Giorgio - privilege is one free fish whenever anyone builds a cathedral, victory condition is completely covering one opponent's zone of control with your own. This was the first time I made use of the Stable, which increases your zone of control from two steps from every city and inn to three steps instead. It is obvious from the number of graves in this photo (even covering my cathedral in the top right corner) that I did not win this game.

I had six fountains, so no pollution from cities themselves now (usually 3 per city). But of course farming, mining and fishing still leave behind pollution.

Michelle's cities when she won the game. She didn't even need a Market this time, and she barely needed the Dump. The Dump reduces pollution by four, and her second city produces three pollution. The Dump also prevents your opponent from dumping pollution in your zone of control. I wonder whether she built it more for defensive purposes.

The game board. I (yellow) managed to spread my inns (small square markers with yellow shields) to the centre of Michelle's start terrain tile. I would probably need another two or three turns to completely surround her. But the question is whether I would survive another two or three turns.

Monday, 29 October 2012

Seasons

Plays: 3Px2.

It has been quite a while since Allen, Han and I did a virtual boardgaming session. Now that daylight savings time has ended in Australia, the time difference with Han will be three hours instead of two. It will be more challenging because we tend to play in the evenings. Gaming on the internet is convenient, because the computer does all the setup and calculations for you. There are no physical components to fondle, and you lose the human touch a little, but there's Skype, so we still have lots of banter.

The Game

Seasons is played over 3 years of 4 seasons each.There are 3 steps per season, but the game progress marker may move between 1 to 3 steps every round, depending on the actions of the players. So the pace of the game varies from game to game. Every round some dice are rolled (one more than the number of players), and each player picks one. There are various icons on the dice. Some award energy tokens (there are four types), one lets you convert energy to crystals (crystals = victory points), one lets you draw a card, one lets you increase card slots, one lets you gain crystals directly. On your turn, you make use of these icons, and also play and activate cards.

A different type of dice are used in each season, and different types have different distributions of icons. Some energy tokens are more abundant than others depending on the season. The energy-to-crystal conversion rate is also different depending on the season.

The round game board is basically a tracking tool. The Roman numerals at the centre indicate which year you are in. The colours along the edge are winter (blue), spring (green), summer (yellow) and red (autumn). The numbers are the steps within each season. The area between edge and centre shows the energy-to-VP conversion rate. We are currently in the summer season (see the black cube covering the number 7), so we use yellow dice.

You start the game with 7 energy token slots and no card slot. You start the game with 9 cards, which are picked using a drafting mechanism. Everyone gets nine random cards at first, picks one and passes the rest left, and this continues until everyone has claimed nine cards. Cards usually cost energy tokens to play, and give all sorts of powers as well as victory points. Some powers take effect once only when the card is played, some have ongoing effects. Some need to be explicitly activated, sometimes by paying something. You need to gain card slots before you can play cards. During the game you don't get to draw cards unless you use the card icons on the dice. Even then gaining a card is optional. You draw a card, look at it, and then decide whether you want to keep it. Any card not played by game end costs 5VP.

The most basic way of scoring VP is converting them from energy tokens. However you should always try to find more effective ways of scoring points. Cards being played give VP's, but more importantly the card powers can present huge scoring opportunities, or provide some steady benefits throughout the game to help you score VP's by other means. The is a lot of variety in the card powers, and there are many interesting combos that can be made.

The Play

Both Han and I were new to the game. Allen had played a few times before. We did a beginner level game first, where everyone starts with predetermined sets of cards, i.e. no drafting, and the card sets already have decent synergy. Gameplay was brisk, and the implementation at BGA was good. Han and I raced ahead in scoring VP's, but Allen hung back. We soon realised why. He had one card that could let him score 40VP in one shot. It could convert all his energy tokens to 4VP each. He had increased his energy token slots to ten and had filled them up, so that one patiently orchestrated move catapulted him ahead of us. To everyone's surprise, he didn't win the game. At game-end scoring, Han's card VP's let him overtake Allen to win by less than 10VP. Han 183, Allen 176, Hiew 134.

In our second game we picked the normal level, i.e. there was drafting now, but we only used the standard cards numbered 1 to 30. At the advanced level, advanced cards numbered 31 to 50 are used. This was the proper game now. We had to make our own luck when we drafted cards. We did not score as high as the learning game. When drafting cards, they need to be split into three groups, each becoming available at the start of each year. So you need to decide which cards to make available early (usually those that give ongoing benefits) and which to have later (usually those big scoring cards that require time to set up for). Picking cards that have synergy is important. Your cards will guide how you play. You need to adjust your play to your opponents' cards in play, and also the cards that you have seen and passed and know are coming sooner or later. The game is mainly about the cards and their combos. The rest of the game is just a framework.

There is much variety in the cards, and there are multiple copies of each card in the game.

Like Dominion, you can use 1 energy = 3VP as a guideline. That's the best rate when you convert (the term used in the game is "transmute") energy to crystals. Doing conversion at 1:3 takes a little planning. You need to have space to store energy, you need to wait until the right season comes, and you need to be able to claim a die with the transmute icon. Transmutation is more or less a reliable way to earn VP's, but with cards to support you, you want to do better than that. So it can be useful to compare whatever you are going to do against the 1:3 exchange rate. If it's no better than 1:3, it may not be worthwhile.

The gist of the game is collecting energy and converting them to VP's. You try to do this as effectively as possible using your cards. There are opportunities for clever play, in how to get your cards played, how to collect many energy tokens, and how to make the most of your card powers. Your cards determine your long-term strategy.

The Thoughts

I found Seasons just so-so. I wonder whether I am biased by my poor showing. I am a big fan of Race for the Galaxy, and I like 7 Wonders very much too. The card play in Seasons has elements of both these games, but somehow it didn't quite click with me. Despite the very beautiful artwork, I keep getting the nagging feeling that this is just another cube-conversion exercise. Player interaction is low to medium. You can sometimes take a die that you know your opponent desperately wants. You should think of what your opponents can do with cards that you have passed up. However you are mostly charting your own strategy, taking into account your opponents' strengths and weaknesses nonetheless, but usually not being able to do much about them. There are cards that penalise your opponents, but often they can't be blocked. Your opponents just need to accept such penalties and where possible mitigate them.

I do like that there is long-term planning required. Pulling off a big scoring action which requires much preparation is very satisfying. One thing good about the game is it is very brisk, so I'm still happy to play and explore the card combinations further.

Urban Sprawl

Plays: 2Px1 (with rule mistake)

Boardgame designer Chad Jensen's claim to fame is a wargame series - Combat Commander. His first venture into Eurogames, Dominant Species (2010), was a great success. Urban Sprawl is his next Euro-style boardgame, so naturally there are high expectations.

The Game

In Urban Sprawl, players together develop a city, from humble beginnings to a sprawling metropolis. The board shows a 6x6 grid, and only has a handful of small buildings at the start of the game. Each row and column has one victory point (VP) or money marker, and more may be added during the game. As players construct buildings, they compete for majority in every column and every row. Whenever a card with a payout icon matching the marker in a row (or column) appears, there will be payouts to players with buildings in that row. The more buildings you have, the higher the payout, which is in the form of VP or money. This aspect of the game is an ongoing contest throughout the game, allowing players to earn money to fuel their ongoing construction activities and to score VP's.

On your turn, you get 6 action points to claim cards from the board. There are 5 permit cards and up to 8 building cards to pick from. Cards that have been on the board longer cost fewer action points (Through the Ages style). Each permit card has 1 to 4 permits, and can be used for 1 to 4 types of buildings. A building card depicts a specific building of a specific type, size (1 to 4) and special ability. To construct a building, you pick a building card, pay permits depending on building size, pay money depending on location, and place a building tile of the appropriate type (colour) and size onto the board. The building monetary cost is the total value of the VP and money markers in the row and column the plot of land is in. Land plot costs can change when markers are added or moved. You use the special ability of the building immediately. A building once placed onto the board is only useful for majority competition. The building special abilities are single-use, the building card is removed from the game once the building is constructed on the board.

The early game. The round markers in red and yellow on the western and southern edges of the city are the payout markers. These are pre-printed on the board. There are spaces on the northern and eastern edges for more payout markers. The cards on the left are the permit cards, and those on the right are building cards. There are three decks of building cards, and splitting them into three decks creates a story flow.

To build in the lot with the single red building near the centre of the board now would cost $25, because the relevant markers are 1VP, $8, $10 and $6. 1 + 8 + 10 + 6 = 25.

Build permits. The card on the left can be used for any building type, but the one on the right can only be used for purple (residential) buildings. The election icon at the bottom centre means an election will be done for one office. The round yellow icon means payout for the $12 marker (if it is already on the board).

The lower row are the building cards. The border colour is the building type, the pieces of paper is the number of permits required. The red circles on some of them mean a payout for the specific valued marker is to be done when the card is revealed.

Building special abilities vary greatly. Some give VP's, some give money. Some impact the owner, some impact other players too. The effects often depend on the board situation and who constructs the building. One building that is very useful to one player may only give a small benefit to another. One that is disastrous to one player may only impose a small penalty on another.

Some buildings give vocation tiles, which in turn give VP's and money. Every time another vocation tile of the same type comes into play, everyone who already has such tiles gains VP's or money. So vocation tiles can be a good long-term investment. One tricky thing is in every game only about half the cards will be used, so you won't know exactly what combination of cards will be in play. There will be variations from game to game.

There are six offices in the game, which are basically special powers that players can hold on to as long as they still hold the office. The mayor is the player who has the most vocation tiles, the contractor is the player with the fewest VP's, and the other four offices go to those who own the most buildings of the four types. Benefits of the offices include things like getting 8 instead of 6 action points, and getting payments from other players every round. These offices are another aspect the players compete in. Most offices only enter play mid-game, and elections for specific offices only occur when specific cards with election icons are revealed.

The small squares are the vocation tiles. The big squares are the offices.

The contractor is an interesting "office". It is a catch-up mechanism to help the trailing player. The contractor gets to demolish others' buildings to build his own over the plot of land they occupied. This can greatly alter the majority situation on the board, especially if a few small buildings are demolished at the same time to make way for one big building. Many early-game buildings are small and can easily get built over later in the game. Another privilege of the contractor is his own buildings can't be demolished by the Urban Renewal cards, which are a type of permit card.

Much scoring is done during the course of the game. At game end, there is a payout for every VP marker, bonuses for leftover money, and bonuses for the various offices (e.g. the mayor scores for each of his buildings next to a park). The player with the most VP's wins.

The money is nice and thick.

The Play

Allen and I did a two-player game. The game felt a little tactical, because on your turn what you can do very much depends on what cards are on the board. However there are ways to mitigate this. You have one slot for keeping a building card, i.e. you don't need to build it immediately. This can be very helpful when you desperately need a building, be it to avoid disaster or to claim a windfall, but don't have the means to construct it yet. It is also possible to hoard some permit cards, so that you have flexibility. Many aspects of the game still need a long term view - which building types to focus on, which rows and columns to compete in, which vocation tiles to collect. These all need to be factored in when making your choices turn to turn.

Allen and I remained quite close in VP's in the early game. However one crucial moment completely changed that. There was one building which if built by me would allow me take 24VP from Allen. We both saw it coming. I couldn't build it or claim it into my temporary card slot. However when Allen's turn came, he was distracted by another lucrative building, and forgot to construct this building in order to deny me its special ability. So on my next turn, I constructed it, and robbed 24VP from him. That effectively created a 48VP gap! Allen never managed to catch up.

As the trailing player, he did enjoy the contractor office for most of the late game though. He demolished many of my buildings and steadily sapped my strength. One strange thing that I noticed was the Urban Renewal cards became quite useless in the late game. These cards are supposed to be very powerful because they allow you to demolish others' buildings. However in a 2-player game, once the contractor office comes in play, these cards become useless. The contractor doesn't need them to demolish his opponent's buildings. His opponent can't demolish his buildings in the first place, so Urban Renewal cards are useless. I wonder whether I'm missing something.

We made one big mistake in our game. When payout icons appeared, the payout should be in the form of either VP or money. We had misunderstood that we could choose any combination of VP and money. This benefited me more, because I was better positioned for most of the big money payouts, and many times I collected VP instead of money. I would not have been able to maintain such a big lead if we had played correctly. However, that also meant Allen might not have monopolised the contractor role for so long. Our game really shouldn't count. My impression of the game is not fully accurate.

Late game. The city is still not very full yet. Now there are a few parks around (green tiles).

The Thoughts

It seems many people feel there is too much randomness in Urban Sprawl. I don't think it has much more randomness than Dominant Species. Although there is randomness in which building cards will be in play and what order they will turn up, the players can make long-term plans, e.g. which building types to focus on, which rows and columns to compete in, which offices to fight for, and which vocation tiles to collect. If you go in with a plan and you stick to it, you can mitigate some luck. Having a strong foundation in a few areas will help to protect you when bad events related to such areas come up, and will also set you up when good effects or good buildings related to such areas come up. Despite the ever changing nature of the pool of available cards on the board, I feel that players do have much control in this game. I would say this is a game of controlling chaos and not letting it control your fate, at least not too much.

Allen quite liked the game. I think it's because of the variety of the building special abilities. There are many interesting effects, and it is often interesting trying to figure out how to make the most out of a particular situation. I am quite lukewarm towards the game, not unlike my reaction to Dominant Species. I don't think I can articulate well why. I think one reason is I don't like the area majority mechanism. Another possible reason is the game feels rather "mathematical" to me. Most games are just their settings being converted into a manageable, mathematical form, with rules governing the mechanisms and providing a framework for players to compete in. Urban Sprawl has many thematic elements, e.g. how land prices increase and fluctuate, how old buildings are demolished to make way for new ones, and how certain buildings contribute to certain industries (the vocations). However when I played the game, I keep seeing the mathy mechanisms instead of the story of a developing city. I keep getting reminded about it being real life converted to a simplified, mathematical form, instead of being able to immerse in the setting. Somehow I don't quite click with Chad Jensen's designs, and I'm quite sure I'm in the minority.

Urban Sprawl is a game where players need a long-term strategy, but their immediate actions are restricted by what cards are available on their turns. The long-term strategy will often steer the immediate actions, but sometimes where feasible you may want to adjust your strategy. There are many different aspects for the players to compete in, and most are inter-related.

One thing that got me thinking is the contractor role. It is a catch-up mechanism for the sake of balancing the game. Helping the trailing player is good because it helps to keep everyone in the competition. If everyone still has hopes of winning, everyone will remain interested and the tension can be maintained till game end. However, having played a number of Splotter games recently, it gives me second thoughts about catch-up mechanisms. The Splotter guys don't put catch-up mechanisms in their games. Their games are unforgiving. If you make a bad move in the early game, you can be as good as eliminated (yikes... "player elimination" is often frowned upon by Eurogamers). However, if it is your poor play that got you into trouble, then perhaps you deserve to suffer. Why should the leading player's good play be diminished? Catch-up mechanisms can feel artificial, existing for the sake of making scores close in order to maintain excitement. Chess doesn't have any catch-up mechanism. You can handicap yourself when playing against a weaker player, but once a game starts, you just play your best to beat the opponent.

I'm going a bit off tangent, but I think this can be an interesting debate.

Saturday, 27 October 2012

Web of Power Card Game / Richelieu

Plays: 2Px3 (against AI)

China by Michael Schacht is a game that I greatly admire. It is a remake of Web of Power (which I am not sure whether I have played before), with a change of map and some rule tweaks. It is simple, short, and very clever. I recently bought Web of Power Card Game on the iPhone. The boardgame version of it has a different name - Richelieu. The iOS app is branded this way probably because Web of Power is more well-known.

The Game

Web of Power Card Game is a 2-player-only game about competing for majority in 12 areas. The game starts with all cards randomly laid out face-up in four rows. Eight wooden tokens are placed face-down on specific positions. Every card has one or two symbols. At least one symbol (and sometimes both) is for one of the nine countries in the game. When there are two symbols, the second symbol can be for one of the three powers - military (sword), clerical (cross) or political (castle). On your turn, you claim one or two cards. A card being claimed must be the leftmost or rightmost card of a row, i.e. you usually have 8 choices at any one time. If you claim two cards (one after the other), they must be of the same country, and they must not have more than two country symbols in total. E.g. France and France+Clerical is OK, France+Military and France+Political is OK. Usually you want to claim two whenever possible. Your goal is to claim more symbols than your opponent in as many areas as possible (9 countries and 3 powers). In an area where you have more symbols than your opponent, you score points equal to the number of symbols you have. Scoring is done at game end, after all cards have been claimed, and the higher scorer wins.

That's the basic concept. There are a few more elements that make things interesting. Each player has three ownership markers. On your turn, you can place one of your markers on any card to reserve it. This is not a hard reservation. Your opponent can still claim the reserved card, but to do so he must discard one of his markers. If he discards all his markers this way, your reservations will effectively become hard reservations, because he will no longer be able to claim your reserved cards. Placement of markers is very important.

Another key element is the 8 wooden tokens. They are claimed by whoever claims the cards they are on. Each wooden token has one symbol, which can be one of the countries or powers, or it can be a special ability to recover a discarded marker. The wooden tokens is hidden information, so it introduces some uncertainty in whether you are winning an area.

At game end, in addition to normal scoring based on majority, there is also a penalty of 5VP for each area that you have no symbols in. 5VP is a lot, so it is important to not be completely cut off from any one area.

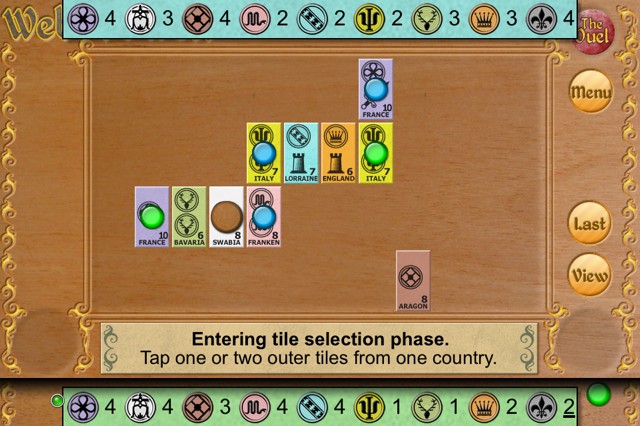
Late game. Only one wooden token remains, on the white Swabia card. The blue and green circles are the player markers. The bars at the top and bottom show the current status of the majority competition. The numbers mean total country symbols, total wooden tokens, clerical symbols, military symbols and political symbols. The underlined numbers mean they include symbols from wooden tokens.

Another view of the same state in the game, this time showing the 9 countries. The AI (blue) is leading in five countries, and I am leading in three. We are tied for one country (purple - France).

The Play

I have played against the Easy, Medium and Hard AI's once each, managing only to beat the first two. The game is very much about squeezing out that additional bit of efficiency in claiming cards and tokens. You want to set yourself up to claim two cards in one turn, and also to claim tokens. At the same time, you need to block your opponent from doing so. You want to get at least one in every symbol, to avoid the stiff penalty. Tying with your opponent can be important. When tied, no one scores. So letting your opponent score or tying him can be a difference of about 4VP, which is significant. Because of this, the secret tokens can have a big impact. It's only one symbol, but one symbol can be the difference between winning and tying, or between tying and losing.

There can be some long-term planning, in deciding which countries / powers to focus on. I find that I just see two to three turns ahead. I prioritise short-term extra gains, i.e. those additional bits of efficiency like claiming tokens and claiming two tiles on one turn, and depending on how these actions position me, I then decide which symbols to fight for and which to give up on. Actually, even for symbols which you are surely losing in, it is still beneficial to claim cards with such symbols, because although you won't score, you will deny your opponent points.

I find that the bulk of the strategy is how to place your markers. This is how you position yourself for the next few turns. Markers hinder your opponent and protect your interests. When I played against the Hard AI there were quite a few "A-Ha!" moments when I saw it making clever moves. I was clearly outclassed from the beginning. The AI kept setting itself up to claim tokens and sometimes to claim two cards, and at the same it also denied me from doing so.

Game end scoring screen.

The Thoughts

Web of Power Card Game feels very tactical. The key is analysing the board situation and devising the best move to set yourself up for the big moves - claiming two tiles or claiming tokens. It's a clever and quick filler game, good for gamers but may not work for non-gamers who do not want to think too much when playing. It rewards skill and new players will likely suffer when facing an experienced player. That was the case when I challenged the Hard AI. As an iOS game I think even after you master the skills, it will still be worth the occasional play as a time-waster. However it is mostly an open information game (the only hidden information being the tokens), so I suspect often there will be just one or two optimal moves for any board situation. Once you master the skills, the game may become a little stale, because often you will be just analysing the board and calculating the best move, like solving a mathematical problem. The uncertainty in the tokens is important to keep the game interesting. I've only played three games and am nowhere near mastering the skills, so I may be completely wrong. For now I'm still interested in challenging the Hard AI.

The game is very different from China and Web of Power, just to set your expectations. There's area majority and the setting is similar, and the game is quick and clever like most of Michael Schacht's games, but other than these, there are no other similarities.

Monday, 22 October 2012

Rommel in the Desert

Plays: 2Px2.

I think I have noticed this game since 2004 or so. It's an old classic block wargame, and it has a strong reputation. If I remember correctly it was out of print when I first learned about it, but it was later reprinted. I have never been a proper wargamer. I have played some block games (Hammer of the Scots, Pacific Victory), some card driven games (Successors, Washington's War - new version of We The People, Hannibal: Rome vs Carthage - another older well-known classic wargame), but I have never played a hex-and-counter wargame. I have been thinking about whether to buy Rommel in the Desert on and off over the years, but never decided to do so because I don't play wargames often, and with Wilderness War still unplayed, should I be buying another wargame of about the same complexity that may just sit on the shelf?

But in the end, of course I bought it. I bought it this year, and (sorry Wilderness War) managed to get it to the table about 5 months after receiving the game.

The Game

Rommel in the Desert is about the battles in North Africa during World War II. The star of the show is, of course, the military genius Erwin Rommel. There are no personalities in the game, just military units, but there is one special rule just for him. In scenarios where German units are in play, once per round some German units can move one more hex. And this can be a big deal.

The game is played on a long thin map of North Africa, with the Axis base near the western end and the Allied base (Cairo) near the eastern end. There are a few ways to win, e.g. capturing Tobruk, or having more units than your opponent at the end of the scenario. The game has many scenarios of different lengths and complexities, all reflecting historical situations. Some units are to be set up on the board, and others will arrive as reinforcements at predetermined times. Each round in the game represents a month. Players will draw supply cards, get reinforcements, and get build points to repair units, deploy units and even set up minefields. Then they take turns playing cards and performing actions - moving units and conducting combat. For movement, there is much dependency on the the various types of roads, from highways to trails, because they provide movement bonuses. Units by themselves can move between one to four hexes only. Combat are single round affairs. There are four types of units - infantry, tank, anti-tank and artillery, and each type has a different effectiveness attacking different targets. There are also unit type specific rules, e.g. tanks must attack enemy tanks if any are present, artilleries can only be attacked if not protected by other unit types. Like most block games, each unit (or block) rolls as many dice as its health level, and if hit, it is rotated to reduce its health level.

This is the first scenario. The Allies (red) only have four initial units, and the Axis (black) eight. The month track shows when new units will appear.

The map is long and thin. I suspect most action will be along the Mediterranean coast, because that's where the highway is. It's just too difficult to travel across the desert.

Supply cards are key to the game and present an element of bluffing. You need to spend supply cards for almost all actions. About a third of supply cards are decoys, i.e. they have no value and can't be used for anything other than bluffing. On your turn, you can spend one to three supply cards to do various types of combinations of movement and combat. E.g. a single supply card lets you do one move and then conduct one round of combat in any or all combat hexes. Three supply cards let you do Move, Combat, Move, Combat. What is interesting is you play your supply cards facedown, and you can mix in some decoys. You take your actions, and only reveal the cards after your turn is over. Your opponent won't know how many real supply cards are being played, so when you attack him, he has to decide whether to avoid battle or stay to fight. Are you launching a strong offensive that he should try to avoid? Or are you just bluffing? Supply cards are precious and need to be spent wisely, especially when you get a lousy hand with lots of decoys.

The most crucial concept in the game is supply. You need to ensure every unit is supplied, i.e. they need to be able to trace a supply line all the way to your base. Roads can form supply lines, with different roads supporting different distances. Units can be nodes in supply lines, e.g. a supply line can run from one unit, via a medium road, to another unit two steps away. Where there are no roads, units can only link to other units in the immediate next hex, not unlike children holding hands. Don't let go of your friends! In C programming terms, I think of linked lists.

If your unit becomes out of supply, it may become disrupted, and being disrupted is bad. Disrupted units are basically useless until they recover. They are immediately routed if any enemy unit catches them. They can't form supply lines either. Protecting your supply lines is very important, and so is exploiting opportunities to cut your opponent's supply lines.

The Play

Allen and I played two games, but the first one took probably 20 minutes including setup. The rules explanation probably took longer. We played the first scenario (when Rommel is not in North Africa yet). The unit count was low. He played the Allies (British), which had fewer units but they were more mobile units. I played the Axis (Italians only in this scenario), which had more units, but most were slow-moving infantry. In history, the Italians suffered a loss despite their greater numbers. In our first game, we hesitantly approached each other initially, then Allen pounced at a weak point with all his units. I used some unengaged units to go behind him to cut his supply line, while the engaged units tried not to get killed too quickly. This move basically ended the game. All four of his units would become disrupted, and his reinforcements were not coming soon enough, so he conceded defeat. That was quite an abrupt and unexpected end to our game. We decided to go again.

Allen (Allies, red) attacked some of my units (Axis, black). I used a motorised infantry unit (the one on the left) to circle around the battle hex to cut his supply line. He was quite screwed now, with all units engaged.

This time we were much more careful with our supply lines. This time, it was my turn to have my supply line cut by Allen. I bunched up my huge group of units, and he spread himself thin to surround me. He had to spread his units very thinly because they needed to hold hands to maintain a supply line all the way to that lone unit which would cut my supply line. He needed to have units in an uninterrupted chain of hexes because there were no roads to help form his supply line. He cut my supply line, and this was very dangerous for me. I had precious little time to reestablish my supply line, and if I failed, all my units would be disrupted with no one to rescue them. Thankfully I had enough (real) supply cards to launch a Blitz attack (which required 3 supply cards). I had a big group of 8 units. I split them up, with four going backwards to attack the lone Allied unit which had cut off my supply line, and four going forwards to attack two Allied units, which if defeated would in turn break Allen's supply line. Sending four units to attack Allen's lone unit was only possible using Blitz, because I could only move two units into that battle hex per Movement. Blitz is Move + Combat + Move + Combat. Thankfully I managed to kill Allen's lone unit and reestablish my supply line. That was quite a scary moment. Not that I hadn't foreseen the possibility of having my supply line cut. I knew I could have responded this way, but in hindsight I was making a gamble. If my die rolls were unlucky, it would mean game over for me.

This was our second game. I had bunched up my units (mostly infantry), and Allen sent a quick recon unit (the one to the right of my army) to cut my supply line.

I split my army into two groups. One group of four went backward (to the right) to attack the lone Allied unit that had cut my supply line, and had now managed to eliminate it. The other group went forward (to the left) to engage two Allied units.

After that initial skirmish, Allen and I continued to carefully manoeuvre our units. My card draws were poor, and I played defensively to conserve my supply cards. I told him that since I was projected to have a higher unit count by game end (which meant I would win a small victory, unless he captured Tobruk), I could just sit tight and force him to attack. That was actually just half the reason. The other half was my shortage of supply cards. I passed and did Withdraw a few times, which was the only action that didn't need any supply cards. I found that even Withdrawing was tricky. I needed to continue to protect my supply lines. I needed to spread out my units enough so that supply lines were protected, and yet at the same time I couldn't leave them too dispersed because they would get easily defeated if attacked. I needed to leave them close enough so that in case one group was attacked, others could quickly come to help and at the same time protect my supply line.

Some of my infantry units were quite badly worn down. Allen had more tanks than I did, and they were effective against infantry. My infantry units needed to be recalled to my base to heal, before being sent to the front line again. As I continued my defensive play, Allen came under time pressure to attack. The first scenario was a short 6-month scenario, with not many cards drawn every month. He engaged one of my groups, and fighting started. At one point I made a rather cruel decision of letting some of my infantry units die. I decided not to commit more units to that battle, and instead used them for manoeuvring around the battle hex. I guess I could tell those poor souls waiting desperately for reinforcements that it was for the greater good. I was sacrificing pawns for better strategic positioning. Allen won that battle, massacring a few of my units, but I still had greater numbers, and was better positioned for the next even bigger battles. Time was running out, so Allen was forced to take a risk and attack. It was not to be. I had numerical superiority, and by that time I had some tanks of my own too. The Axis (Italians) won.

We were in Month 4 of 6. I had slightly more units at the frontline, and two new units would be coming on board as reinforcement the following month.

Blocks in block games provide fog of war. You won't know exactly which units are what until you engage them in battle, during which all battling units are revealed. After a battle concludes, blocks stand up again. You will try to remember the units that you have seen, but sometimes you won't be able to remember the exact details, like how much damage an enemy unit has taken.

I rarely play wargames, so I am not familiar with the standard icons. Crosses are infantry. Crosses with two dots are motorised infantry (i.e. men with cars, or lorries or motorcycles). Crosses with ovals are mechanised infantry (i.e. men with armoured vehicles). Ovals represent tank tracks, and units with ovals are usually tanks. The single big dots are artillery.

This was the final big battles of our second game. I made good use of my superior numbers and Allen was unable to turn the tide.

The Thoughts

When I read the rules and made a rules summary, I found the game quite daunting. There are so many details in how movement is done, how supply lines work, and how combat works. There are many possible combat situations, and there are rules for each of them. Chris Farrell has said before that this is a true wargame, and I fully agree. This is not an introductory wargame, or a wargame with many Euro-ish elements which make it more accessible to Eurogame players. I have not played many wargames, so Rommel in the Desert is a fresh experience for me in many ways. The need to constantly watch your supply line is one. There is much consideration behind every manoeuvre - protecting your own supply line, threatening your opponent's supply line, and even tempting your opponent to make risky probes at your supply line. This aspect may become second nature after you get used to the concept, but it really defines the feel of the game and the mindset when playing the game.

The bluffing and psychological play is another key feature of the game. This is partly caused by the scarcity of resources. You never quite know how many real supply cards your opponent has. You also want to mislead your opponent when he is trying to guess how many supply cards you have. Playing three cards on your turn may scare your opponent into withdrawing when you advance to engage his units, when you actually only have one real supply card among them, i.e. you are only making a basic Move + Combat action, not anything fancy like Assault or Blitz. I have not really experienced much of this yet though, since the scenario that I played was quite simple.

Conserving your supply cards and making the most effective use of them is very crucial. The game requires careful manoeuvring and planning. Combat lasts one round only, so units can get stuck in battle for quite a number of rounds. It is usually important to maintain some mobility, be it to exploit new opportunities, to cut off enemy supply lines or to support already-engaged comrades.

I quite enjoyed Rommel in the Desert. It's something different for me. I don't know for sure whether I'm liking it for what it is or I'm liking it because I wanted to. I hope it's the former. I'm eager to play again, this time trying other more challenging scenarios, and with Rommel in play. There are quite many scenarios that come with the game, so there is plenty of replayability.

Friday, 19 October 2012

boardgaming in photos

22 Sep 2012. This is the Mayfair Games version of Automobile, with different artwork and components from the Treefrog version that I own. I taught the game to 4 newbies. I did rather poorly and came a quite distant third. I was the only player who didn't need to take a loan, but now I realise that's probably a bad sign - I was not doing enough business!

23 Sep 2012. A vicious 2P game of Carcassonne (with some expansions). Michelle and I had many meeples, because the Abbey and Mayor expansion added some special meeples, but we used them up quickly because many of them got locked up in incomplete features.

Michelle managed to complete that big city at the centre, which gave her a lot of points.

24 Sep 2012. A solo game of Town Center which I started with a blueprint in mind and mostly managed to build the city according to the blueprint. I scored 90pts, which is a Level 8 achievement out of 10 levels. The highest level is 100pts or more. After this game, my interest in solo play dropped significantly, because it feels like I have solved the puzzle. I wonder whether this will impact my enjoyment of the multi-player game.

26 Sep 2012. Le Havre on the iOS against Han and Allen. I lost by 3 points! I had many buildings (that row in the centre). I focused on buildings in this particular game.

30 Sep 2012. I downloaded the latest version of Triple A, a free software that lets you play various Axis & Allies-like games. I played two games against the AI's, playing the Axis in Axis & Allies Europe 1940 (AAE40) and then the Allies in Axis & Allies Pacific 1940 (AAP40). The AI's are rather weak unfortunately, so I recommend only playing against your human friends. At first I thought the AI's appear weak in AAE40 because I played the Axis and thus had the initiative. Afterwards I played AAP40 as the Allies, and the AI did much worse as the Axis. How can Japan be not spending money on transports in AAP40? Did I set up the AI's wrong?

This is a screenshot of a combat resolution. This was the fall of France in Axis & Allies Europe 1940.

In North Africa, Egypt fell easily to the Italians because the Allies vacated it! What the...? Italy is dark brown, UK is light brown, France is blue. Sicily was captured by the UK, but I (as Italy) was taking it back.

This screenshot shows the game interface, with a minimap on the top right, and action details in the lower right section. The Soviet Union amassed troops at Novgorod. My Germans were steadily marching east. I even vacated Normandy and Holland. The Allies had no transports in the Atlantic to threaten me with an amphibious assault.

Germans assaulting Moscow.

USA had built up an impressive fleet containing 15 destroyers, which were now parked in the English Channel. The USA fleet had no fighters (on carriers) to defend itself. I attacked it with my smaller German fleet supported by a big air force. I had captured Scotland, but the time was not yet right to launch an attack on England (and London).

The final attack on London. I had transports shipping troops over, and also had units coming down from Scotland.

This is AAP40. I only took one screenshot of this game against the AI. This was the USA fleet attacking Japan.

3 Oct 2012. Ascension on iOS. Han had six (!!!) constructs in play (that number 6 in a circle at the top centre). Constructs are cards that you keep on the table (as opposed to being discarded to your personal discard deck) which give benefits every round. Needless to say I was quite happy to be able to defeat the Sea Tyrant (the highlighted card on the right) which forced him to discard all but one construct.

6 Oct 2012. I have been wanting to buy myself a copy of Antiquity since I first played it in Dec 2011. I have been trying to find a copy at a not-too-unreasonable price. The game was out of print for some time, but was back in print last year. However I still could not find a copy at a reasonable price. The publisher Splotter was planning to update their website to support game purchases in early 2012. It was only in Sep 2012 that they managed to launch the new website. I didn't hesitate long. I ordered a copy. The total cost (including shipping) was the highest I have ever paid for a boardgame (that I know of). I have heard a number of horror stories about how Splotter doesn't shrink-wrap their games and doesn't pack their games well when shipping them. So I was a little worried. However the game arrived in a good condition. The game was shrink-wrapped. There was protective foam. There was a little damage to a corner of the shipping box but no damage to the game box itself.

Upon opening the box, this was what I saw. Half the components had come off the sprues. I think the sprues are originally much larger than the box, with the large terrain tiles being the centre part. So when the game is being packed, a sprue is taken apart - the terrain tiles are separated, and the left and right thirds of the sprue become two separate sprues that can fit in the box. There are many many many small components. Thankfully only a few of them were damaged (bent, or pressed from one side), and the damaged ones were generic pieces, not those one-per-player building tiles. Overall I am very pleased.

14 Oct 2012. I managed to convince my wife Michelle to play Antiquity with me. In the past few years she has not been keen about boardgames, especially learning new ones. I persuaded her that it was a bit like Through the Ages (which we used to play a lot), so at least I set her expectations that it was going to be a long game.

This was my first city. I had built my houses in a way to leave space for my cathedral (top left).

There is no green player colour, so I picked black. Usually my second choice is white, but no white here either. The city in the foreground was my first city. I had just built my second city, in the background, and it was approaching Michelle's area.

I bought these three plastic boxes, which could store most of the non player-specific game pieces. I only needed that small tin box to store the Cart Shop and Store pieces. I put player-specific pieces in ziplock bags, one bag per player. That means one set of buildings are in each bag.

Near the end of the game. We made a number of rule blunders, but it wouldn't have changed the result. Michelle picked the patron saint San Christofori which let her store an unlimited number of goods, and her victory condition was to collect 3 goods in each of 8 types (food and luxury). I decided to try the greatest patron saint Santa Maria, which gave me the benefits of all the other four saints, but required me to fulfill two different conditions to win. I really floundered in this game, expanding and growing, but never quite focusing on an end goal. It might be my own poor showing, but I think picking Santa Maria is the hardest way to win. Although I have played the game before, this time I underestimated the time pressure caused by the ever increasing famine level. I had the nice buildings that removed graves, reduced pollution and cleaned pollution, but eventually the famine level got so high that I couldn't avoid graves. I realise in Antiquity you actually never get off the slippery slope. You never reach a breakeven point and stay there. Even if you get to a safe position, it is only temporary. You need to race against time to end the game before all hell breaks loose.

The best thing that came out of this game is Michelle is willing to play again. Woohoo!

I had not yet started using my third city at all.

One thing that I think went very well in this session was how I taught Michelle the game. She cannot stand long (or even medium) game rules explanations. She prefers to just get going and figure out how things work along the way. I, on the other hand, tend to prefer to cover everything important before starting a game. It's the "I did tell you about this rule" mentality. This time, in order to minimise her suffering throughout the game (the game mechanism is punishing enough), I just went through the 10 phases of a round quickly, explained a few basic buildings, and then we started playing. I didn't describe 90% of the buildings, and didn't even describe the patron saints. That information is available on the player mat, albeit in a summarised form. During the game, under appropriate situations, I gave her pointers on what buildings she might want to consider. She also checked out the player mat herself during play, figuring things out herself and asking questions (as opposed me feeding her information). This worked out really well. She explored the game herself, at her own pace.

I realise this learn-as-you-play approach works very well. My gamer friends and I often joke about any first game being just a learning game, as in those who lost can justify the loss and the victory of the winner doesn't count. Now I realise the learning game concept (the real one, not the joke version) can be very effective in teaching a game and making sure everyone has fun. I recently applied this successfully teaching Thebes to my 7-year-old daughter. It was unplanned and the success surprised me.