Monday, 14 May 2012

Sunrise City

Plays: 4Px1.

The Game

Sunrise City is one of numerous games that Allen has participated in Kickstarting. It is a city-building game where players build a city together and try to score the most points, and there is a touch of Sim City (the computer game) in it. There are only 3 rounds in the game, and in each round, players add new zones (empty plots of land designated for a particular building type), then compete to claim zones, and then finally construct buildings on empty plots or on top of existing buildings.

There are 5 types of zones / buildings (like residential, industrial, commercial) and each is colour coded, with purple being a joker / wild colour (multi-purpose zone / building). Every round each player gets some land tiles and building tiles. All land tiles will be placed during zoning, which is basically expanding the play area. After that players take turns claiming zones using their disks. Disks can be placed on top of other disks, even your own. By placing your disk over that of another player, you are robbing that zone from him, which, of course he can do to you too on his next turn, if he still has any disk left. Placing a disk on your own means you are securing that zone and others may not rob it from you anymore. Then comes building construction. Each building consists of two squares of one or two colours, and it can be built only on empty plots or buildings with corresponding colours (taking into account that purple = joker). When building on an empty plot, you must own at least one of the two zone. If the other zone is owned by another player, he may earn points from your build action.

This is the zoning phase. The game starts with just one tile, the city hall on the left. During zoning, some rivers may be formed. You can't construct buildings across rivers. When placing a new zone tile, you must extend an existing road, but it is not necessary to make sure every road matches another road or every river matches another river. This is not Carcassonne.

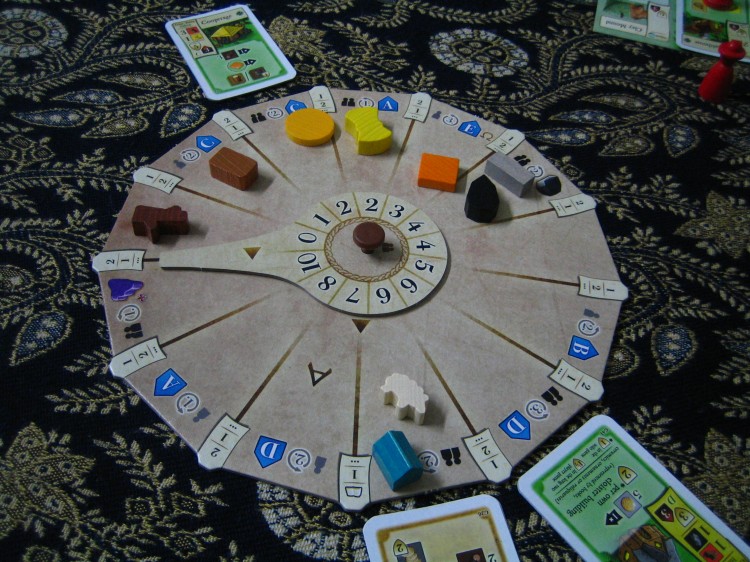
This is the zone claiming phase. If you place a disk directly on another one of your own disk, you secure that zone tile for yourself. Yellow and blue each has two secured zone tiles, and green and orange each has one.

Mid way through a game. Buildings can be stacked on top of other buildings. It is even possible to stack one building on top of two other buildings, i.e. using half of each of these two buildings. We don't have such an example in this photo though.

There are a few ways of scoring, and all are quite straight-forward.

  1. When zoning, you earn 1pt per adjacent zone of the same colour as the new zone that you have just placed.
  2. When you build, you score for the building itself.
  3. When you build on an empty plot, zone owners (possibly including another player) score bonus points.
  4. When you build on top of another building, if the new building is the 3rd, 5th, 7th etc level, you score bonus points.
  5. When you build a specific building type next to some special zones, you earn bonus points.

The items that can score big are the building score (#2) and the zone owner bonus (#3). The others usually score 1pt or 2pt. For every 10 points you gain, you earn a star, and stars are what counts at game end. What's interesting about scoring is if reach your next 10 points precisely by landing on the 10 spot, you earn two stars instead of one. So you want to manage and plan your scoring so that you score these bonus stars as often as possible.

There are some role cards, which are drafted at the start of the game. At the start of every round, each player secretly picks one from his hand and all cards are then revealed simultaneously. The numbers on the cards determine the start player, and the special abilities on them are effective for their owners for that round. E.g. a bonus point whenever anyone constructs a Level 1 building, the ability to rob secured zones.

Components are nice. That's a role card at the top. Stars are your final score. The disks are big and beautifully done.

The Play

We did a four player game, and all were new to the game. I found that each round required planning right from the start, because based on the buildings you hold, you need to try to do zoning so that you will be able to construct as many of your buildings as possible. You often need to make use of zones placed by other players. The zone claiming is a competitive part of the game, because to be able to construct a building on empty plots, you need to secure at least one of the two zones where you want to construct the building. Competition can be fierce, if players are desperate for a particular zone and keep placing their disks on top of one anothers' disks. Sometimes you may need to concede some zones in order to not get stuck in too many bidding wars and then get left with too few zones. Sometimes it may be better to go for the less desired zones because you may be able to claim more of them.

Turn order is important in both zone claiming and construction. In zone building it can advantageous to go later, because it means you can usually put your disk on another player's disk if his disk is sitting on a zone you insist on claiming. However, during construction it is usually better to go earlier, because you can build on the best spots earlier, before your disk gets used by other players' build actions. You always try to construct as many buildings as you can, but sometimes when there aren't any possible spots, whether empty plots or on top of other buildings, your buildings will be wasted.

I find that planning for the bonus star (i.e. landing on the 10 spot on the scoring table) is always a high priority, because of how significant the reward is. The scoring methods which give few points can be very useful for this, so they should not be underestimated. When you can hit the 10 spot, scoring two stars, and then on your next turn, score exactly 10 points again to earn another two stars, it is very satisfying.

Unfortunately we only managed to play 2 (of 3) rounds, because one of us had to leave. We fumbled a little in Round 1, but were able to fully understand the game by Round 2.

The Thoughts

The rules of Sunrise City are pretty straight-forward, and I'd say this is a family game that can be played with casual gamers. When we played, we had casual (or possibly non-) players in the mix (we played at OTK). They actually found the rules a little complex at first. I think as a long-time gamer, I take for granted my familiarity with many game mechanisms and forget that to non-gamers, many of these mechanisms are quite alien. I wonder whether in my many past blog posts my assessments of "can be played with non-gamers" or "suitable for families" were overly optimistic. As for Sunrise City, after some thought, I still believe it is suitable for casual gamers, as long as they are interested to play. If a person is resistant, he will struggle even with Carcassonne, even if he is a rocket scientist.

Sunrise City has an interesting mix of viciousness and pleasantness. The pleasantness is in the building aspect of the game, and nastiness is in the zone claiming and also in building over an opponent's disk. I find the scoring mechanism the most interesting, because instead of maximising every move, you are fine-tuning, always trying to hit the 10 spot jackpot. I can imagine in more advanced play, players will be watching out not to directly or indirectly help opponents hit the 10 spot, and even try to intentionally push them over the 10 spot.

I worry a little about the amount of luck in getting valuable buildings. The building values have a rather wide range. This is somewhat mitigated by the fact that more valuable buildings are harder to build than less valuable ones, e.g. good ones require specific colours, while cheap ones often have a purple (joker) part. Also higher scoring buildings usually make it harder to fine-tune your scoring to hit the 10 spot frequently. So, my worry may be unfounded. I need more plays.

Overall Sunrise City is a light-to-medium weight game which is Euro-ish but does not feel too familiar. I like that the design feels fresh (or maybe I just haven't played enough games...).


Noble Knight Games - Buy, sell and Trade! New and Out-of-Print RPG's, Board Games, Miniatures, Dungeons & Dragons

Monday, 7 May 2012

Sekigahara

Plays: 2Px1.

The Game

Sekigahara is an entry-level card-driven block wargame about the civil war in Japan which ended the Sengoku Jidai (the warring states period) in 1600. The two factions in this war are the Ishida and the Tokugawa. Ishida is loyal to the young heir of the previous supreme military leader Toyotomi Hideyoshi who had died of illness two years ago. He perceives Tokugawa as a threat that needs to be eliminated. Afterall, Tokugawa's clan is the richest and most powerful clan in Japan. As Ishida plots to unite various clans to destroy Tokugawa, Tokugawa too has been building alliances via policital marriages and diplomacy. As the tension builds, the great clans align themselves to one of these factions. Open warfare breaks out.

The game is played on a map showing Honshu, the main island of Japan. Armies are represented by blocks, and each block belongs to one of the great clans. Players use cards to muster blocks onto the board, to move blocks, and to conduct battle. There are 9 castles and 9 resource locations that the players fight over. They are worth victory points, and whoever controls more victory points after 7 rounds wins the game. There are a few sudden death victory conditions. If the enemy leader, i.e. Ishida or Tokugawa, is killed in battle, you win. If Tokugawa successfully besieges and conquers Osaka, capturing the young heir Toyotomi Hideyori, he wins.

Blocks in this game are simpler than most block wargames. They usually just show one to three mons (clan symbols), which indicate their strength. A block does not rotate to represent losses. If it takes casualties, it is eliminated and leaves the game. Cardplay is what drives the whole game. On your turn you have limited movement and mustering actions. You need to spend cards to do more than the bare minimum. You also spend cards if you need to force march your armies. Armies, especially big ones, often move rather slowly. Cards are also used to conduct battle.

This is the starting setup. Ishida blocks are golden, Tokugawa blocks are black. Osaka, where the young heir Toyotomi Hideyori is located and needs to be protected by the Ishida faction, is where those eight golden blocks are. The capital Kyoto is just to the east of Osaka, where the two golden blocks are. Tokugawa's capital of Edo (modern day Tokyo) is in the southeast.

The top right and bottom right corners of the board are the recruitment boxes. Players need to take a muster action to bring those blocks into play. The thick brown lines are highways which connect Osaka, Kyoto and Edo. Red dots are resource locations.

Initial Tokugawa forces in Edo. The board and the blocks have icons indicating how the setup should be done, which is convenient.

The initial setup in the area near Kyoto. Normal-looking castles are initially controlled by the Tokugawa player. Castles with yellow outlines initially belong to Ishida.

Battle strength is not determined only by the blocks present. You need to have cards with mons matching the blocks to deploy the blocks. Else the blocks cannot lend their stength to the battle. So a big enemy army may in fact be quite weak if your opponent has few matching cards. A small or medium sized army can be very powerful if the owner holds the right cards. Being able to deploy many blocks from the same clan is very powerful, because every subsequently deployed block of the same clan gets a strength boost depending on how many blocks of the same clan have been deployed. Some blocks have a gun or a cavalry icon, and these when paired with special attack cards can be devastating. One type of card which can completely turn the tide of a battle is the Loyalty Challenge cards. Whenever you deploy a block, your opponent may play a Loyalty Challenge to make your block turn traitor. If you are unable to show a card of the same clan from your hand, the block betrays you and contributes strength to your opponent instead. So, often you need to think carefully before playing the last card of a particular clan from your hand.

After all cards are played, whoever has more strength wins the battle. Both players need to take casualties based on the opponent's strength, and the loser takes one extra casualty. Big battles are usually devastating to both sides.

Some of the cards. Cards with two mons (clan symbols) can be used to deploy two blocks instead of one. The small number in the lower right corner is for deciding turn order. Every round both players must simultaneously spend one card to determine who will decide the turn order.

At the start of every round, you must discard half your cards before you draw 5 new cards. This means you can't really hoard cards and hope to get a perfect hand for one big battle. However each round you have two turns, so based on what your hand is like at the start of the round, you can try to manouevre your armies into position in Turn A, and then go for the big battle in Turn B. The control of castles and resource locations determine who gets to draw an extra card and who gets to draw an extra block into the mustering box at the start of a round. So during the game there is this economic aspect to compete in.

The Play

This was my first play, against Allen who had played once before. In his previous game he played Tokugawa, so for this game I asked him to play Ishida. The first thing I felt once the game started was - Whoa! Tough decisions! And it's hard to get things done. Movement is usually quite slow. The default movement speed is just one step. There are ways to increase speed, but if you try to move more than 4 blocks together, there is a speed penalty. Also in the early game, the number of cards we had was hardly enough to fight any battle effectively.

In the early game Allen seemed to fumble a little with the rules. The last time he played was quite some time ago. He lost a few early skirmishes. I managed to keep ahead economically. I started the game with five castles to his four, and I also grabbed resource locations more quickly. That gave me the advantage of drawing an extra card and drawing an extra block into my recruitment pool every round. In the central region, my mostly-Fukushima army attacked and captured one of his cities with a castle. On the eastern side, his Uesugi army obliterated my Date army. My huge Tokugawa army in my capitol in the southeast kept rather quiet. Only around mid game some of the Tokugawa forces marched northwards to besiege and eventually capture one of Allen's castles. Allen's Uesugi army in the east did not approach my Tokugawa army or my capitol Edo. I caught up with him and defeated him in battle. His remaining forces retreated westwards and captured my Maeda castle at the northern tip of the map. My Tokugawa army continued to give chase, eventually defeating his Uesugi army again and recaptured my Maeda castle.

On the far right, Allen's Uesugi forces had destroyed my Date armies. I mustered many Tokugawa blocks but had not yet done much with them. Now I marched a big stack towards Allen's castle, while still keeping some blocks in Edo, in case his Uesugi armies came calling.

My smaller Tokugawa army had captured Allen's castle and had also marched further north to capture a resource location. Allen's Uesugi forces on the east had completely destroyed my Date forces there. I needed to muster more troops in Edo to deter him.

On the eastern side, Allen's Uesugi forces had retreated to the northern shore while securing some resource locations. My Tokugawa army had previously fallen back to the castle, wary of his greater numbers and also wanting to rendezvous with reinforcements from Edo. Later, this Tokugawa army chased the Uesugi army along the northern coast, heading westwards.

Meanwhile, things on the western side of the map were tense too. My large and mostly-Maeda army marched from its northern home towards the central part, near the capital of Kyoto, meeting with my other medium and mostly-Fukushima army which earlier captured one of Allen's castles. Allen mustered many of his Mori forces from the Mori recruitment box to Osaka. The Mori clan is a special case, having a special recruitment box with five blocks in it at game start. If I attack Osaka, these five blocks come onto the map for free. But if Allen wants to bring them in, he needs to pay one card per block, which is expensive. The story behind this is Ishida was wary of the powerful Mori clan and ordered the Mori daimyo (clan leader) to stay in Osaka. Allen had a terrifying stack of blocks in Osaka and Kyoto. He marched some of them to attack my combined Maeda-and-Fukushima army in Sawayama, the city east of Kyoto. This was the first big battle of the game.

We were both well prepared for this, having cards to deploy every single block. I had more blocks, and had a higher total strength to win the battle. Losses were heavy on both sides. Allen lost all but one block, which was subsequently overrun (and killed) anyway. This was a devastating loss for him. Our forces were greatly reduced on the western side. However after that Allen was able to muster new blocks more quickly than me, and we had a second major battle, this time with Allen emerging victorious. My armies were outnumbered in the west, but Allen split up his armies to go conquering resource locations and castles. I hurriedly sent a Tokugawa army from Edo in the southeast, traveling along the southern highway, to come to the aid of my much dwindled Maede army.

My Maeda (five circles) army and my Fukushima (three-pointed leaf) army prepared to converge.

The first major battle, Allen's eight blocks against my eleven.

Allen's army contained many Mori blocks, which he had spent many cards mustering from the Mori recruitment box. At first we thought I lost the battle. Then later we realised I had missed out one Maeda gun block. I still had a card to deploy this block, and this was enough to tip the balance.

The aftermath of the first big battle. I temporarily occupied Kyoto after overrunning Allen's lone survivor from the battle.

This was the second major battle. This time Allen's army was led by Ishida himself (that complex kanji character). My army was crushed.

On the western side, I had an army en route from Edo to support my depleted forces. Thankfully the highway let me move more quickly.

Only towards the second half of the game Allen was able to compete more effectively for castles and resource locations. Towards late game, I wiped out his armies from the eastern half of the board, but didn't have enough armies or time to capture all of the castles and resource locations there. I guess that's poor planning on my part. A wasted opportunity. Most of our remaining armies were in the western and central parts now, and our numbers were about equal. I had a comfortable economical lead, and if I could last until the end of Round 7 still holding on to this lead, I would win. Since movement speed is generally quite slow in this game, it would be tough for Allen to capture enough castles and resource locations in time. In Turn B of the Round 7, I intentially marched a smaller army to Kuwana, a resource location, to prevent Allen from getting to my castle in Anotsu, just past Kuwana. I could afford to lose the battle in Kuwana and let him gain one resource location (worth 1VP) as long as I could secure my castle (worth 2VP). I left a sizeable army in Gifu castle to deter him too.

A medium sized and previously very successful Tokugawa army lead by Tokugawa himself descended upon Tsuruga, a resource location, to secure yet another resource location for myself. Just to be on the safe side, you see. Things looked bleak for Allen. There wasn't much he could do now that it was his final turn. Then I suggested why not try to attack the Tokugawa army? If he could kill Tokugawa himself, he would win a sudden death victory. And he thought, why the hell not?

And I'm sure you can guess what happened next...

In hindsight, I didn't need that lousy Tsuruga resource location at all, which put me in range of Allen's army. I already had more than enough VP's. I had miscalculated in my haste. Even when that climatic (or anti-climatic, depending on how you see it) battle started, I could still have kept my win. I only had two Tokugawa cards for my four Tokugawa blocks, which should already be a warning bell. However I still went ahead to deploy my Tokugawa daimyo block first (because, hey, it was free to do so). When it was time to take casualties, I was forced to eliminate my Tokugawa daimyo, because the priority for elimination is deployed blocks first. If I had considered the situation more carefully, I should have simply not deployed my Tokugawa daimyo block, and just let the other blocks suffer losses. I didn't need to deploy blocks to eliminate Allen's blocks. I was going for an economic victory and killing his blocks was completely unnecessary in this battle. So, two perfectly aligned blunders - advancing my over-confident Tokugawa daimyo into Allen's attack range because of one unnecessary VP, and committing the same daimyo to battle unnecessarily - allowed me to snatch defeat from the jaws of victory. I just taught myself a lesson on complacency.

Allen's Turn B of the very last round. I had sent a small 2-block army from Kiyosu to Kuwana to prevent Allen from marching towards my castle in Anotsu. I was willing to sacrifice this small army to ensure I would still hold Anotsu castle at game end. Two blocks from Kiyosu also marched to Gifu to boost the defenses there and to deter Allen. My Tokugawa army prevoiusly at the Maeda castle in the top right corner had marched to claim Tsuruga, a resource location. Allen left Gifu castle alone, and attacked both the small army in Kuwana and the Tokugawa army in Tsuruga.

This was where Tokugawa fell (the single mon block with the three-dot banner). Ishida himself had personally led the army which defeated Tokugawa. Such sweet victory for Allen!

The board situation at game end. Look at those dead people on the left side of the board! I can't help thinking of "I see dead people; they are everywhere" from the movie Sixth Sense. On the board, I controlled 6 castles (12VP) and 4 resource locations (4VP), totalling 16VP. Allen controlled 3 castles (6VP) (there's one in the northwest hidden by two of his blocks) and 5 resource locations (5VP) (Tsuruga was his, not mine), totalling 11VP. Why??!! Why did I send Tokugawa to die?!!

The Thoughts

Sekigahara is succinct and easy to learn among wargames. However it does not feel simplistic. The starting setup is partially (maybe 25%) random, so there is some variability. The cards you get determine how you want to play your first round, so there is no standard opening move. There is more manoeuvring than battles in the game, and I would say the manoeuvring is more important than the actual battles. Movement is slow, which means you need to plan ahead where you want to move which army. Getting your armies into position and saving up the right cards for battle (or striking at the right time when you have the right cards) are critical to your battle success. So battles are mostly a culmination of all the manoeuvring beforehand. You still do have some decisions to make during battles, e.g. which blocks to commit, the order of committing them, whether to save some cards to protect yourself against a Loyalty Challenge, and when to play a Loyalty Challenge card. The Loyalty Challenge card aspect presents a difficult decision not only to the potential target (who needs to consider saving a card for protection), it also presents a tough decision to the card holder. Having a Loyalty Challenge card means you have one fewer card that you can use for deployment. If you play a Loyalty Challenge card too early and your opponent can defend against it, you have just wasted the card while your opponent loses nothing. The card he has just shown you returns to his hand and you'll probably scream silently "I'm screwed!!".

There is a bluffing element in the manoeuvring. You don't exactly know how strong an army is, because even if it is an army you have battled before and you have seen the composition, you don't know whether your opponent is currently holding the right cards to have it fight effectively. A bold move may be a mere bluff. A humble army may be more potent than you think. There is no dice or randomness when battle is joined. The blocks and cards involved are fixed now, and it comes down to how the combatants play their cards. When a battle ends, both sides get to draw the same number of cards as they have spent during the battle. So you will not become card starved due to battle, just that the cards you draw may not be useful for other battles you may want to fight. You draw cards for battle casualties too, so the loser who has lost more blocks sometimes has a bit more compensation.

The game is very exciting. Every block lost in battle leaves the game permanently. There are no step losses. You don't really get to muster many blocks, so you cannot afford to waste your blocks. Because of how costly battles can be, even for the victor, the build-up towards each battle is tense.

Due to the mostly fixed setup and the relatively simple map, I do worry a little about replayability. At the moment I'm enthusiastic to play Sekigahara again. It'll take at least a few more games to see whether replayability is a valid concern. Luck of the card draw may be another concern. However, due to the slow army movement, you do have time to prepare and ensure you get the right cards you need. Every round you discard half your cards, which means you can keep those you want and hope that the new cards drawn include some that you want. One action that a player can take in lieu of movement is to discard some cards and draw the same number. This can be helpful if you are desperate. Generally my view is you should just make the most of the cards you have. If you get many Date cards, then try to position the Date army to fight. You sometimes need to spend cards for movement anyway, so "useless" cards can be used this way.

Sekigahara reminds me a little of Hammer of the Scots in terms of granularity and complexity, but the rules have fewer exceptions so it is easier to learn. Gameplay and feel are quite different though, but both bring out the backstory well.


Noble Knight Games - Buy, sell and Trade! New and Out-of-Print RPG's, Board Games, Miniatures, Dungeons & Dragons

Friday, 4 May 2012

the excitement of 3-player games, and Tammany Hall

From late 2010 to early 2012, most of my boardgame sessions were 3-player games with Han and Allen. This period started after Allen's first child was born (he was more house-bound than usual so Han and I decided to play at his place to keep him sane), and lasted until Han's overseas work assignment (and I'm pretty sure we'll continue as before once he returns). During this period I easily settled down to this comfortable routine, and became lazier and lazier to organise bigger boardgame sessions. Jointly, we had many games suitable for 3 players, more than we could play. I think we developed a kind of play style together. We tend to be brisk in playing (and we often quote our 50-minute game of Merchants and Marauders); we sometimes take turns simultaneously and end up confusing ourselves whose turn it should be; we often do that "attack-him-he's-the-leader!" thing. I've found that 3-player games have a unique type of excitement, especially when the game being played has some, but is not purely, direct confrontation. Not being a fully confrontational game means you have a choice of taking an aggressive action or taking a peaceful or self-development action, and when you decide to take the aggressive action, it makes the offensive intent more pointed and much clearer.

3-player games have a delicate balance, because any apparent leader will quickly be targeted by the other two players, and he will have a tough time maintaining his lead going one against two. However, the temporary alliance between the other two players is often fragile, because once the alliance achieves the objective of bringing the leader back in line, it will be every man for himself again. So even during the period of alliance, each ally will be trying to better position himself to come out stronger after the dust settles. Distrust your enemy, distrust your ally even more. 3-player games often become a tricky balance of doing well but not appearing too strong, or finding the right opportunity to push for a quick victory before your opponents gang up on you. It's a bit like that scene in Reservoir Dogs - every player holding two guns, each pointed at one of the other two players.

I was reminded of all this when Han, Allen and I played two games of Tammany Hall at www.slothninja.com. We have played this game in its physical form before, quite some time ago, but never got around to play it again until recently. The game has been out-of-print, but is now on Kickstarter trying to achieve the funding goal. The games we played were turn-based and we didn't need to be online at the same time, so the pace was more like a PBEM (Play-by-E-Mail) game. It took us about 5 days to complete a game. I was amazed how exciting and tense the games were. Allen would agree that they were downright stressful. I want to write about these two games. I won't describe the rules (which I've covered before). I'll just jump straight to the session reports and what I was thinking and feeling during the games. You may want to Ctrl-click to open the screenshots in a separate window while you read the descriptions that accompany each screenshot.

Game 1: 23 - 27 Apr 2012

A game of Tammany Hall has 16 rounds, with every 4 rounds culminating in an election. That track at the top shows that we were at Round 4. This being a 3-player game, only Region I (the bottom bit) was in play initially. Regions II and III would open up in Q2 and Q3 respectively. I was red, Allen was yellow, Han was purple. The most defining moment of the Q1 election was the fight for Ward 7. In this screenshot, only Allen (yellow with 3 bosses) and I (red with 1 boss) were fighting for it, but before the election started Han placed one boss to enter the race. I gave up on it and didn't spend any favour chip. Allen and Han were both determined to win it and spent as much as they could. Unfortunately for them, they tied, so both of them lost, wasting many chips in the process. I became mayor.

Being mayor earns you 3VP, which is nice, but it has its drawbacks, because once you become mayor, you must assign special abilities to your opponents, which they can use against you afterwards, while you don't get any special ability. Also the mayor is first in turn order, which makes it hard to defend against others, especially slandering. The rulebook tells you not to complain though, because you are already given 3VP. After the Q1 electcion, I was the apparent leader with a big red target painted on me.

This was just before the Q2 election. Q2 was less eventful than I expected. I actually managed to hold on to the mayor post, although I wasn't really eager to do so. Allen had been using his Precinct Chairman power to shift immigrants around to strengthen his influence, often diminishing mine at the same time. Han had been using his Deputy Mayor power to collect favour chips. Although I won the most wards, many were sparsely populated, i.e. they didn't help much in becoming most influential in the four immigrant groups. Becoming mayor twice in a row meant my score was far ahead now.

Q3 elections had just started. I (red) made a deal with Han (purple) so that I'd let him win Ward 6 and he'd let me win Ward 4. This way we could both conserve some favour chips.

Near the end of the Q3 elections. Han (purple) later won Ward 10, which meant Allen won 6 wards, I won 5 and Han won 4. Allen became the new mayor. In Q3 he had majority influence over three immigrant groups - the Irish, the Germans and the English! That's 9 favour chips going to him. My score was still in the lead (18), but Allen was close behind (15), and Han was further behind at 10. Allen had a lot of favour chips, and would be powerful going into the final Q4 election. It looked like Han and I would need to gang up on him to prevent a runaway leader.

Q4 elections had just started. Ward 1 (bottom left) had just been resolved. Allen and I competed for it, both spending many chips, only to end up tied. This was painful for both of us. I was very badly positioned going into this election. In the final round before the elections, I slandered away Allen's bosses in Wards 3 and 5, so that I could win both wards uncontested. However, Han, whose turn was after mine, swooped in and did the same to me, claiming those two wards. I had expected Han to slander Allen's bosses in Wards 8 and 15, since Allen was the bigger threat. In hindsight, I should not have left myself so vulnerable. Throughout Q4 Han and I had been mostly focusing our attacks on Allen, and I built a false sense of security that Han wouldn't target me. I should have tried to compete with him in some wards, e.g. 6, 7 or 10, so that he would be forced to play more defensively and would not have such a free reign.

Near the end of the Q4 elections. I would eventually lose in Ward 17 too. I didn't have as many favour chips as Allen, so I lost to him in Wards 2, 4, 9, and 17. Han had a magnificent come-from-behind victory, winning 10 wards! That's 10VP. He also gained 6VP for most Irish, English and Italian favour chips left, and 3VP for mayorship.

Final score: Han (purple) 30VP, Allen (yellow) 22VP, Hiew (red) 19VP.

Game 2: 27 Apr - 3 May 2012

In our second game, we were assigned the same colours as before. Han was purple, Allen was yellow and I was red. This screenshot was taken during the Q2 election. Earlier, in Q1, I had become mayor uncontested. All three wards that I competed in were won uncontested. Han and Allen competed in two wards and each won one. That meant I, again, became the big fat target, not just because I was ahead in points, but also because I had conserved the most favour chips.

In this second game, I tried to be more aggressive in pressing my advantage. Instead of trying to go for the less populated (and thus less attractive) wards in order to appear weak, I wanted to fight for the more densely populated wards, so that I could gain majority influence with more immigrant groups. In this screenshot, Ward 1 had just been resolved. Han (purple) and I (red) competed for it. He spent all favour chips he could afford and won it. I hadn't expected that, so the favour chips that I had spent were wasted. It was a right decision for Han, because eventually he gained majority for three immigrant groups, greatly helped by the immigrants in Ward 1. He also won the most wards and became mayor.

This was during the Q3 elections. Noone bothered to contest for Wards 17, 11 and 13 on the right, because they had few immigrants, and I think also because noone was keen to be mayor going into the last election.

This was the start of Q4, i.e. it shows the outcome of the Q3 election. Han (purple) won Ward 1 (but his token was cut off from this screenshot), 8 and 9. Allen won three wards too, and I won four. Ward 4 was tied between Han and Allen. Ward 15 was tied between Han and I. I became the reluctant mayor going into Q4. I was leading in points, but Han and Allen were not far away. At this point Han had very few favour chips, much fewer than us, so he'd be at a disadvantage when he had to compete during elections. I gave him the Council President power which let him lock up wards. This would be useful to him because he could quickly lock up a ward with only his boss present to make sure he'd win it uncontested, without needing to spend favour chips. I wanted to keep him in the competition so that he could still be a threat, and Allen couldn't focus his attacks (and defenses) only on me.

Final round before the Q4 elections. I had many English (white) favour chips. However Allen used his Chief of Police power well and removed English immigrants from many wards where I wanted to fight for (3, 5, 7), rendering my English favour chips useless there. Han made good use of his Council President power and locked up Wards 1 and 4 for himself.

Q4 election had just started. Contested wards were 3, 7, 9 and 14. All of us had the chance to become mayor, and that 3VP bonus would be a big factor in determining the final winner. The 2VP for having the most leftover favour chips for each of the immigrant groups could also determine victory. It was going to be a very close game.

I knew I (red) would lose to Allen (yellow) in Ward 3, and Han (purple) would lose to him too in Ward 14, because neither of us had enough of the right coloured chips to fight with him. So it all came down to what would happen in Wards 7 and 9. Han already had 5 wards in the bag, and if he won a 6th ward, he would became mayor. That would be 9VP, for the wards and the mayorship. I too wanted mayorship, because with my current lead, that would likely seal my victory. However I would need to win both Wards 7 and 9, and also have more favour chips than Allen (because we would be tied at 5 wards each).

This was the favour chips situation. Han was purple, I was red. If I wanted to safely win Ward 7, I'd have to spend 4 chips. If Han conceded Ward 7 and didn't spend any, then the favour chips he had left would be enough to tie me in Ward 9, denying me Ward 9. If Han gambled that I would take a risk in Ward 7 and spend fewer than 4 chips, he might spend all he had to try to win Ward 7 and secure his mayorship. It all came down to one crucial decision. Would Han try to win Ward 7? I gambled that he would, and this was what followed...

Han didn't spend any favour chip in Ward 7. I won it having spent four, when I could have won it spending just one. We tied for Ward 9, so neither of us won mayorship. Han (purple) and Allen (yellow) both had 5 wards, but Allen had tons more favour chips, so Allen became mayor.

This was the favour chip situation at game end. After all the scoring was done, Allen (yellow) won the game with 26VP. I (red) had 23VP, Han (purple) had 19VP. I retraced our game, and found that if I wanted to win, I would have needed to spend either 1 or 2 favour chips to fight for Ward 7. Only then I could tie Allen with 5 wards, and also have more favour chips than his 12. That would have been a perfect storm, but I guess one should not expect such perfect alignments to happen easily.

Thoughts on Tammany Hall

These two games of Tammany Hall had been tremendously fun and tense. Allen said he needed a break from such stress. This reminded me of my two PBEM games of Axis and Allies Anniversary Edition against Han in 2009 (Game 1, Game 2). I reread these session reports and enjoyed myself reliving the wars.

Tammany Hall is a perfect information game. The types of actions you can take is low, but there are many possibilities and implications. In theory you can work out all the possible outcomes, but in practice it is quite daunting. In a PBEM-like format, you can take your time working out all the possibilities, but when playing face-to-face, that can become analysis paralysis. There is still some uncertainty. What new immigrants become available after the immigrant pool is exhaused is random, but you don't refresh immigrants very often. The blind bidding (committing favour chips) during elections is not random. You need to guess your opponents' intentions. The elections can be very tense. I am very impressed that with not many rules and with few action types, the game can create so many possibilities and opportunities for clever play, and also bring out the theme convincingly.

I hope the Kickstarter project works out well. This is a game that deserves more attention.


Noble Knight Games - Buy, sell and Trade! New and Out-of-Print RPG's, Board Games, Miniatures, Dungeons & Dragons

Thursday, 3 May 2012

Tournay

Plays: 2Px1.

The Game

Tournay is a successor of sorts to Troyes. Troyes is a cube-converting, VP-scoring Eurogame with interesting use of dice and a bit of worker placement. Tournay is the card game version. It has some similar elements, however overall I find it to be quite different. It is more a tableau game (like Race for the Galaxy, 51st State, San Juan), and of course the "interesting use of dice" aspect is gone, because it has no dice.

Every player starts with his own 6 workers (in the basic game), 2 of each type - soldier (red), cleric (white) and civilian (yellow). You use workers for drawing cards from similarly coloured decks, the more advanced decks requiring more workers. Cards are buildings and characters that you can play into your 3x3-grid play area by spending money. Once played, you can place your workers on buildings to use their powers. There are three event cards visible at any one time, some good, some bad, and whenever a Town Crier card is revealed from any deck, events take place. You can spend workers (and money) to combat events, which are worth points and can also protect you from future events.

The centre area. On the left (which should be the top), the event cards deck, and 3 events revealed. You know what's coming and you can prepare for them, but you won't know exactly when they'll happen. Next, available workers to be purchased. In the basic game, you can only purchase additional workers using specific buildings. Then there are 9 decks of cards, 3 colours x 3 levels. You need to use workers to draw cards, higher level cards requiring more workers.

The lower left section is my personal area - my plaza where unassigned workers assemble, one already used yellow worker (civilian), my $5 coin and my green scoring marker, which is only needed at the end of the game.

My play area during mid game. The Port (1st row 2nd column) lets me use another player's yellow building. The Architect (2nd row 1st column) earns me $1 whenever I construct a building in the same row or column. The Fort (2nd row 2nd column) lets me defeat an event card if the event has occurred before. The Priest (2nd row 3rd column) lets me use a building in the same row or column twice (on different turns, and still requiring a worker). The 3rd row 2nd column building (can't read and can't remember what it is) lets me draw two level 2 white cards. The Monastery lets me buy a new worker. At this point I had defeated at least two events and had used them as ramparts to protect me against events.

As you use up your workers, eventually you will need to spend a turn resetting all of them back to the unused state. Ideally you use all up before you reset, but since there are 3 types of workers, sometimes you are desperate enough to use a particular type (which are all exhausted) that you reset sooner. You can use workers of other players, paying them for such usage, but normally you can't use their buildings. Only some buildings allow you to do that.

The game ends after a player has filled up his 3x3 grid and has constructed at least two prestige buildings, i.e. Level 3 buildings which often score a lot of points for the owner and also some for other players. Other than the prestige buildings, some normal buildings also score points, as do events that have been defeated.

The Play

Allen bought Tournay 2nd-hand, and it was a good deal. He liked Troyes very much. The English version of Tournay is not yet widely available. His is the international version containing English rules. We did a 2-player game. I didn't remember much about Troyes, but I was quite sure the gameplay of Tournay felt quite different. Tournay was all about drawing cards and playing them into your own 3x3 grid, and trying to make the most of your cards. One thing that I felt a little uncomfortable about was you are more-or-less stuck with the cards you draw. You do have some choice when getting a card, either the face-up card (if one is available), or you draw two and pick one. However once you gain a card, you either build it, or you waste it when you exceed the hand limit. I guess you do have a choice of building it or wasting it, but the latter seems just... wasteful.

I have a nagging feeling that a significant part of your success is how lucky you are with the card draw. However, each deck only has 10 cards, and the card powers are mostly quite generic, i.e. they can be useful in many situations and combinations. Having few cards in each deck means players can quickly learn what cards are available and where to look for them. So, maybe I worry too much. The prestige buildings (level 3 buildings) can give a lot of points. It's probably best to hold on to them, try to fulfill the scoring conditions before your opponents guess what they are, and then build them just before the game ends.

I was quite lucky with my buildings. I had one building which let me combat events cheaply, and another one that let me use buildings twice. This combination let me combat many events. I guessed that there would be a military prestige building that awarded points based on number of events defeated, and I was right! I drew that exact same card I was hoping to get. This, plus another combination of a building that allowed me to buy more workers and a prestige building that scored for sets of workers, gave me a comfortable win.

My play area at game end. The top left and top right buildings are prestige buildings. They give you points based on specific criteria. They also give points to your opponents who fulfill the same criteria, although not as many points as are given to you. The red shield icon means victory points. Some buildings give no victory points, e.g. those in the bottom row.

The Thoughts

My biggest impression is how different Tournay feels from Troyes. Tournay is a pleasant construct-your-own-city game, where you try to make the most of clever combinations of buildings and characters, and then shoot for the most suitable prestige buildings. Player interaction seems lower compared to its predecessor. In my one game neither Allen nor I used each other's workers at all. It didn't feel very necessary, since many actions only needed one worker, and the numbers on the dice rolled aspect of Troyes no longer exists. Probably we have not discovered the nasty strategy of using up valuable workers of opponents before they can use them. Troyes has this nastiness in its dice mechanism. We should experiment with this the next time we play Tournay.


Noble Knight Games - Buy, sell and Trade! New and Out-of-Print RPG's, Board Games, Miniatures, Dungeons & Dragons

Tuesday, 24 April 2012

Power Grid: The Robots

Plays: 3P (2 humans 1 robot) x1.

The Game

I've always liked Power Grid, and own most of the expansions. Unfortunately most of the time it's just Michelle and I playing 2-player games. So I was immediately interested when I heard about the Robots expansion which introduces robot players. It allows players to add robot players when the number of humans is low, to make the game more interesting.

Each robot is made up of five parts, and each part specifies some rules governing the behaviour of the robot. The parts can be mixed and matched, resulting in many possible combinations and robot characteristics. There are also some base characteristics of the robots, which they will follow precisely unless overridden by their special characteristics. During gameplay, players need to manage the robots, and in some cases make decisions for them. The robots' actions will not always be optimal. They are there more to be exploited by the humans than to compete. Their actions are mostly predictable, so a clever player will try to use it to his advantage.

A robot is made up of five parts, and each part specifies rules the robot follows for a certain aspect of the game.

The Play

Adding a robot does feel like having an additional player, albeit not a very threatening one. 2-player Power Grid is not as good as 3+ players, so in my case it is nice to have some new dynamics. Phase 2 no longer means all cities are opened up, because the robot can now be used to occupy the second city spot to block your opponent until the start of Phase 3. Taking into account the robot's behaviour is important, and manipulating turn order is important. The cost of having an extra player (or more) is the overhead in calculating the robot's actions (most of which are deterministic) and in managing the actions themselves. Sometimes the robot can be a useful tool to hinder your opponent.

We used the Russia map. Michelle was red, the robot was yellow, I was green.

We played the red, yellow and purple regions. I (green) started near the centre of the purple region. Michelle (red) started near the border of the red and yellow regions. The robot (yellow) started in the most backwater city in the yellow region, but it quickly expanded outwards to interfere with one of us (under the guidance of the other human, of course). Look at how the robot's houses have occupied the 2nd slots of many cities, blocking the remaining player until the start of Phase 3.

Power Grid is still Power Grid though. The game doesn't feel very different. This expansion is not meant to significantly change the gameplay. In the game that I played with Michelle (and one robot), I actually came last, i.e. I lost to the robot! But I swear I was not beaten by it. I was just outmanoeuvred by Michelle. She had quickly connected 17 cities to end the game when I had not expected her to be able to afford it yet. I keep losing to her at Power Grid. Must be the accountant in her.

The Thoughts

I think Power Grid: Robots achieved what it set out to do - to allow robot players to be added when there are too few humans for the game to be interesting. If there are enough humans, say four, or even three, I'd say the robots are not necessary. There is some overhead in managing the robots, but it's worthwhile if it lets me play some interesting two-human-players games.


Noble Knight Games - Buy, sell and Trade! New and Out-of-Print RPG's, Board Games, Miniatures, Dungeons & Dragons

Tuesday, 17 April 2012

Flash Point

Plays: 4Px1.

The Game

Flash Point is a cooperative game about fire fighters trying to save people from a burning building. Working together, the players need to save at least 7 out of 10 victims to win.

The game starts with three victim markers on the board. Some parts of the building are already on fire and some walls damaged. Fire fighters start outside the building. On your turn, you get 4 action points to spend, and once done you do fire spreading before the next player's turn. You can spend action points to move, to open doors, to break walls, to carry victims and to fight fire. To save a victim, you need to carry him (or her, or it; yes you have to save pets too) outside the house, and call the ambulance to pick him up. Whenever a victim is saved, or is killed by fire or found to be a false alarm, a new victim marker is added to the board. So you plunge into the burning house again to answer the next distress call.

After actions are done, bad things happen. You roll dice (one 6-sided and one 8-sided) to determine where smoke will appear in the building, which is a 6x8 grid. If the new smoke appears on a clear space, the space becomes smoky. If the space is already smoky, it bursts into flame. Any smoke adjacent to fire immediately lights up too. If the space is already burning, an explosion occurs, spreading fire or damaging doors and walls in all four directions. An explosion also occurs if fire reaches hazardous materials, which are seeded on the board at the start of the game. There are also hot spots. If the smoke roll hits a hot spot, you must do an extra smoke roll and add a hot spot. If your second smoke roll hits another hot spot, you keep on rolling. Things can get out of hand quickly if you are unlucky. Damage to walls can be good or bad. A collapsed wall section lets you walk through, i.e. it's a shortcut. However, if the building takes too much damage, the whole thing comes down and the game ends.

Fire fighters can barge through burning spaces, but if caught by fire (smoke lighting up, or an explosion occurring in an adjacent space), they are knocked down and are transported to the ambulance. Victims caught by fire simply die.

Each player picks a specialist to play at the start of the game, and can switch roles during the game. Each specialist has a different special ability, e.g. the paramedic can give first aid to revive a victim, so that he can walk by himself and need not be carried. The different abilities can be useful under different situations.

The Play

I did a 4-player game. All of us were new to the game except for Allen who is partially new - he has played a computer implementation before, but the rules are slightly different. I struggled a little with explaining the rules, even though I have read it a few times before, because of the various terms they use. Once things got underway, gameplay was smooth. I guess I needed to physically see how things work before everything clicked.

We kept getting explosion after explosion. It was a race against time to save 7 victims. Like Pandemic, there is a tension between long-term and short-term goals, the long-term goal being to save people, and the short-term being to subdue the fire enough so that it doesn't get out of hand. It can sometimes be tough to decide which to prioritise.

When I explained the game rules earlier, I had explained that among the victim tokens were some false alarms which could be ignored and simply discarded. I asked my fellow players to imagine discovering a cat instead of an unconscious victim. When we actually played, we found that there was a cat token! It was only then I realised I had given a bad example. The cat needed to be rescued too and should be treated as a victim. Sorry, all cat owners.

The round blue markers are victim markers. When placed on the board, they are face down (i.e. showing the question mark). Only when a fire fighter reaches them they are turned face up. The one on the right has been confirmed to be a victim. Now the green fire fighter needs to carry her out of the building.

One funny thing that happened in our game was we kept discovering victims at one particular bed. After carrying one victim from that bed away to safety, we again heard calls for help from the same spot. Must have been some wild orgy. People kept crawling out from under the bed.

Due to the many explosions, many of the walls were damaged and the building started to get shaky. One of us had to switch role to the structural engineer to quickly fix some of the walls so that the building didn't collapse. We came very close to losing the game due to the house collapsing - just one bad dice roll away. Thankfully we eventually managed to save our 7th victim to win the game. At that point, one victim had died in the fire. We decided to try to save the last two. Unfortunately we couldn't, the building finally collapsed soon afterwards, ending the game.

We played the full game and not the introductory game, but we used the easiest level. At harder levels, there are more initial fires, hazardous materials and hot spots.

The dining room in the top left corner is burning very badly. An explosion had spread the fire outside the building. The toilet in the bottom left corner is in a bad condition too. Explosions have damaged the walls.

The fires at the dining room (top left) and toilet (bottom left) are under control now, but the kitchen in the centre is now burning very badly.

The Thoughts

Flash Point feels quite Euro, and at the same time most aspects of the game tie well with the setting. The setting feels real and is something most people can relate to. This can work well as a family game, but probably an adult will need to handle the smoke and fire spreading aspects initially. Actions are easy to understand, and the behaviours of the fire and explosions are intuitive once you see them in action. There are a few illogical aspects, but I think they are acceptable compromises to maintain balance and playability.

Flash Point reminds me of Pandemic, another cooperative game, and I can't resist comparing them. Pandemic is a little tighter, has fewer rules overhead and fewer moving parts, and has that delicious tension of the tendency of infected cities to get infected again. It is more abstract. Flash Point has a completely different setting that players can relate to more directly, as if they are present at the scene of the fire. Using memoryless dice instead of recycleable cards to determine where smoke appears means Flash Point probably has higher randomness, but I see this as a feature, not a strength or weakness. Despite the seemingly higher randomness, Flash Point feels quite balanced. Maybe the many dice rolls average out in the long run, so good and bad luck even out.


Noble Knight Games - Buy, sell and Trade! New and Out-of-Print RPG's, Board Games, Miniatures, Dungeons & Dragons

Friday, 6 April 2012

Ora et Labora

Plays: 2Px3.

The Game

Ora et Labora means praying and working. It is about developing and running a monastery in the middle ages. This Uwe Rosenberg design has many similarities to his two earlier designs, Agricola and Le Havre, especially the latter. You construct buildings which have various abilities, and you place your people on these buildings to utilise these abilities. Buildings come from a common pool, so once a player has constructed a building, no one else can construct it, but they can pay the owner to make use of it.

Each player starts with a plot of land which is partially developed, with basic buildings, limited available space for new buildings, and some forests and moors. Forests and moors can be cleared to obtain wood and peat respectively, and the cleared land can then be used for building construction. The play area can be expanded by buying more plots of land, which can give more forests and moors, and also different landscape types (coast, sea, mountain) which allow specific types of buildings to be constructed.

The monastery grounds at the start of the game. Two moors from which peat can be harvested, and three forests from which wood can be harvested. Three basic buildings, and two vacant spots available for construction.

There is a goods accumulation mechanism similar to both Agricola and Le Havre, where all types of goods will gradually accumulate until someone takes an action (e.g. using a building, clearing a forest) to claim the goods. The amount of goods drops to zero and starts accumulating again. In this game, this mechanism is implemented using the production wheel, which makes things easier to manage. This is not the core of the game though. This is just a solution to a minor problem. So, just a nice-to-have.

The production wheel. At the start of the game, the markers for all goods are piled here, at the zero space.

The production wheel during a game. At the start of every round, the hand is rotated one notch, which will increase the numbers next to some of the goods markers. This is how goods accumulate, without needing to physically add goods tiles to many piles of goods. Pretty nifty. When a certain goods type is claimed, the marker for that goods is moved to the zero space, and it will start accumulating again from zero. The little blue house is a reminder for when the next settlement phase will occur.

Some of the goods tiles in the game. These are double sided. Pot icon means food value, fire icon means energy value, shield icon means victory points worth.

The core of the game is still the buildings, and how you make use of them. There are many ways to earn victory points. There are many types of goods in the game, and some types are worth victory points. Buildings themselves are worth points too, and you need to spend resources to build them. Every building has a settlement value, and these are scored using a special building type - the settlements. Settlements can be built only at specific times during the game. If you have accumulated the required resources, you can build one. It is not mandatory, but it is usually desirable. At game end, each settlement scores its own settlement value, and the settlement values of the four buildings orthogonally adjacent to it. So you want to place settlements next to high settlement value buildings, and vice versa.

The buildings available at the start of the game. On the vertical banner on the top left of each card are: (a) terrain type the building can be constructed, (b) resources required, and (c) building score and settlement value. The little open bible icon means these are the starting buildings. The lower half of the cards are the building powers.

Unlike Uwe Rosenberg's two previous hits, Ora et Labora doesn't have a feeding phase where you must have sufficient food set aside or suffer a penalty. This is replaced by the settlement phase, where if you don't have the resources set aside to be able to build a settlement, it would be at worst a missed opportunity rather than a penalty. Depending on how you develop your monastery, sometimes you may not want to build many settlements.

The game comes with two ways to play - Ireland and France. The difference is in the buildings. Each building card is double sided so you decide up front which side you want to play. I have not studied the differences in detail. I just know that in France you drink wine and in Ireland you drink beer.

The Play

So far I have only played 2-player games. The structure and game end condition are a little different from 3P and 4P games. I am assuming the overall feel of the gameplay is similar. In the games that I have played, we seem to focus a lot on construction. Each building is worth points (both direct victory points and the potential in its settlement value), and sometimes I construct a building more for its points than because of the intention of using it. I wonder whether this is normal. That said, some buildings and building combinations are quite useful. I sometimes use my opponent's buildings, when they suit my purpose. The cost is not too high.

There is still the greed vs planning tension. When you see that a certain good has accumulated a lot, it's very tempting to grab the lot instead of sticking to what you have been planning to do. Do I grab it before my opponent does so? Should I delay constructing that building by one turn? There are often many juicy choices, which means tough decisions.

My monastery at the end of a particular game. I have 7 settlements (cards with a blue house icon on their top right corners) out of the maximum of 8. Normally there are only 4 settlement rounds in a game, but the Castle building lets you build extra settlements.

There is also that "maximising" feeling when you play this game. You want to make the most of every action. You try to build up an efficient scoring engine. You try to develop a high-scoring monastery. Many things are achieved by many small steps, so you are meticulously planning your moves and squeezing every bit out of your actions. One of your three pawns is a prior (whom I call "the boss"), and if he is idle when you construct a building, you can immediately place him on the new building as a free action to utilise the building. You want to make use of this as much as possible. There are a few such small tactical considerations throughout the game.

For 2-player games, the game does not end after a fixed number of rounds like in the 3P and 4P game. The game ends when there is only one building left in the common pool (i.e. not yet built). So there is some tension in timing the game end. If you are using some building combo to create many goods worth victory points, you may want to let the game drag longer. If your opponent is doing this, then you want to try to construct buildings quickly to expedite the game end, even if the buildings aren't high-scoring or useful to you.

Another monastery at game end. I didn't buy any mountain plots this game.

Michelle's monastery. Or maybe I should say nunnery? The buildings with the yellow banners are the monstery itself, and they must be built adjacent to one another, extending from the initial cloister office.

The Thoughts

Ora et Labora feels very familiar, because I have played Le Havre. It feels more open, and the constant pressure in having enough food is replaced by the less intimidating settlement phases. It has a spatial element in the landscapes types and the possible expansions. I can't say which is better. Perhaps it is unnecessary to do so. If you like development games this is a good choice. If you're looking for something very different from Le Havre, you'll be disappointed. Ora et Labora is a complex development game, and it has some differences from its predecessors. I see it as one more choice on my shelf when I feel like playing this type of game. There are many possibilities to pursue in this game, and I like the sense of achievement in developing my own monastery.

The level of player interaction is similar to Le Havre and Agricola, perhaps slightly less tense, not because of the type of interaction itself, but because the game system is more forgiving. In Agricola, claiming four food from the board just before harvest time can be a very nasty action to your opponent who is short on food.

From Agricola to Le Havre to Ora et Labora, the designs have shifted to be less restrictive and more open, giving more options for scoring. However I don't see the earlier designs as inferior, just different. So Ora et Labora does not replace any of its elder brothers, it adds to the family.


Noble Knight Games - Buy, sell and Trade! New and Out-of-Print RPG's, Board Games, Miniatures, Dungeons & Dragons