Friday, 10 December 2021

JOME


The Game

JOME (official website) is a Malaysian design. It is a card game for 2 to 6 players. When I participated in the recent Game On Lah game event, they were in the shop right next to mine where I demoed Dancing Queen. I did not go out to try other games by other Malaysian designers. I stayed at my shop throughout the day. However my wife and children did manage to check JOME out when they came to visit, and they bought a copy to support the designer. 

This is a pure card game. 

The box is small and easy to carry around. 

Rules are short and simple. 


There are two types of cards in the game. The first row is trophy cards, and the second row battle cards. Trophy cards are worth points and you compete to gain as many points as possible. Battle cards are your ammunition to win trophy cards. 


During game setup, you create as many groups of trophy cards as there are players. You draw trophy cards one by one until you have four groups of distinct icons. If you draw a card with the same icon as an existing group, you add it to the group instead of creating a new group. Every player starts with a hand of six battle cards. 


On your turn you play a battle card and then refill you hand. The trophy cards specify which types of battle cards can be used. At the bottom left you can see that a yellow circle battle card and a red diamond battle card have been played. Both these shapes appear on the trophy card. You play your card next to the trophy card based on your seat position. E.g. the player sitting at the top left would play his card at the top left corner of the trophy card. 

The yellow circle card has a value of x2. The trophy card value is 8. The battle strength of the player sitting at the top left is thus 2x 8 = 16. The red diamond card has a value of +2. The battle strength of the player who played this is 2+ 8 = 10. At the moment it is the player at the top left leading. 

When you play card, you must either be first to compete for a trophy card, or you must become the leading player at a trophy group which is already being fought over. Once a trophy card has 3 or more battle cards played next to it, the reckoning is done and the trophy will be won by whoever has the highest strength. He claims the trophy card. A new trophy card is then drawn to replace it. 

Black battle cards are wild cards. All of them have special powers. In the photo above, the Half card halves the strength value of all your opponents. 


The Duos card lets you play an additional card. In this situation above, the player at the bottom right plays two cards on the same turn and wins the trophy. Once there are three cards played next to a trophy card, it is evaluated and claimed by the leading player. 

The dice values on the cards have meaning. In the case of ties in strength, you follow a specific tiebreaking procedure to determine who is stronger. You compare the number of cards, then the card colour and shape, and finally the die value. 

The game ends when the last trophy card is won. Whoever has the highest total trophy value wins the game. If you want a shorter game, you can agree to play to a certain point total. Whoever reaches the goal first wins. 

The Play

JOME is easy to teach and you can start playing quickly. On the get go you can tell which trophies you are eligible to compete for. It depends on whether you have the right battle cards. Trophy cards have different values, and naturally the higher valued ones will be more sought after. It is often good to be first to play a battle card on a trophy card. You claim one of the three slots available. If you have a second card which can be played on the same trophy, chances are even if another player decides to compete with you, you can reclaim the lead with your second card and win the trophy. There is a risk in going first too. If an opponent or multiple opponents have much stronger cards and will beat you to it, you would have just wasted one valuable turn. Your turns and your cards are your resources. You want to be efficient in spending the least resources for the most gains. 

One tedious part of the game is checking for valid battle cards. Battle cards come in 5 colours and 4 different shapes. There is a total of 12 different combinations. This means effectively you have a deck with 12 suits. I don't quite understand why this is necessary. I think it complicates the game needlessly. 


The game is highly tactical in nature. You can't really plan strategically. Every turn you analyse the situation at hand and decide on the best play based on your hand cards. You don't know what cards your opponents have and can only guess based on their actions which trophies they might go for. 

The Thoughts

Essentially JOME is a game of spending your resources (your battle cards) wisely. You want to be efficient, winning as many points as possible with what you are dealt. The rules are simple. This game can target the mass market. Non-gamers and casual gamers can pick it up easily. For gamers, this game does not introduce anything groundbreaking. It will be the kind of game used for spending time with non-gamers. It is also the kind of portable game you can bring on trips. 


These are the wild cards. The rightmost Pow card lets you immediately win a trophy card. I'm not sure whether I have understood the ability correctly. If it works the way I interpret it, then the +10 and the 6-value die are not necessary. One more thing I think can be simplified is how strength ties are broken. The official rules require players to compare number of cards, colour, shape and die value. I would prefer to simply require the player playing a card to exceed the strength value of the current leading player. This way ties will not happen and all the tiebreaker rules can be removed. 

Saturday, 4 December 2021

Dancing Queen public demo


The Game On Lah event organised by Locco ran for two days, 27 - 28 Nov 2021. This event promoted boardgames designed by local Malaysian designers. I was able to participate only on Saturday the 27th, since I had another commitment the following day. My goal in participating was to see how the general public (i.e. non-gamers) responded to Dancing Queen. Throughout designing, playtesting, tweaking and submitting the game for the contest, most people I had managed to playtest the game with were gamers. I didn't manage to get many non-gamers to try it out. So this event was a good opportunity for me to test a different segment. 

The event ran from 11am to 6pm. I arrived around 9:30am. I had much more time than I needed. All the preparation was done in about half an hour. I brought a portable speaker, and throughout the day I played songs from ABBA, Queen, Boy Zone, Spice Girls and Cranberries. These are groups which appear in the game. 


The venue was GMBB Mall, a relatively new shopping mall in the Kuala Lumpur city area, opposite Tung Shin Hospital. This mall specialises in artsy stuff and cultural events. There was not much crowd on Saturday. In the morning and around noon, most people who came to play were other designers who also showcased their games or gamers who knew of the event. There were slightly more people in the afternoon. I had only two tables at the shop assigned to me. I estimate about 80% of the time at least one of them was occupied. In the late afternoon most of the time both were in use. 

By observing how people played Dancing Queen, I learned a few things about how I could teach the game better. Some players still forgot to pass the microphone before drawing a card. This is something I still struggle with. I have considered removing this rule, since it's often hard to remember. However this rule has strategic importance. Whether to draw a card is an important tactical decision, and whether the microphone is being passed is an important consideration. Maybe I just need to find a better way to help people remember to pass the microphone. 


I invited friends to be my helpers - Eva (centre) and Ai Shiang. If I were alone the whole day at the shop, I would have difficulties taking toilet breaks and eating lunch. I would need to ask designers from next door to guard the fort for a while. Having a helper also meant players at both tables could be attended to at all times. 


My wife Michelle and daughters Shee Yun and Chen Rui came to visit in the late afternoon. Once the event wrapped up for the day, we went for dinner nearby to celebrate. 


The shop unit was a little small. It was a deep but narrow unit. I could only fit two tables comfortably. Adding a third would make the place cramped. 


This was the first time I showcased my game design at a public venue. I learned something from this experience so it was worth the effort put into preparing for it. I had actually brought two game prototypes, Police and Saikoyu, but unfortunately did not have the chance to teach them to my visitors. These are simpler games and are probably more suitable for casual players compared to Dancing Queen. 

Dancing Queen is not the kind of game casual players can quickly grasp and enjoy. I don't think it can be a mass market game. Gamers can quickly pick up the rules and appreciate the intricacies. As they play more, they will discover further depth and new tactics. Non-gamers will need some effort to digest the game. I think a successful mass market game needs rules that can be taught very quickly. It should not have many rules, and most of its rules should feel familiar to the target audience. Dancing Queen has a number of unusual rules, e.g. how cards are played face-down and how the orientation of a card determines whether it is a boy or a girl. The passing or end-the-round mechanism also takes some explaining. It's not exactly a hard game to learn. Both my helpers are non-gamers, and they managed. It's just that it is not the kind of game non-gamers can pick up within a few minutes and have their eyes light up. 

Saturday, 20 November 2021

Dancing Queen at Game On Lah event - 27 Nov 2021


Location on Google Map

I will be showcasing Dancing Queen at the Game On Lah event. The event itself is for two days, but I will attend only on Saturday. This is the first time I am doing a public demo for the game. For some other designers, they are bringing games to sell. However I have not yet printed Dancing Queen. So it will be just a public showcase and no selling. If you are interested to play a physical prototype of the game, come visit! 

Thursday, 18 November 2021

Signorie


The Game

In Signorie you play noble families in 15th century Italy. It is an age of political turmoil and great clans rise to power in the Italian cities, controlling politics, the economy and the military balance. You are the leader of your family. You arrange for the sons in the family to get educated in various fields - politics, religion and military. You get the daughters married off to other major clans to build and cement alliances. Doing these and a few other things in the game give you victory points. At the end of 7 rounds, the highest scorer wins. 


This is the main game board. The game supports 2 to 4 players. At the start of a round, dice in 5 colours are rolled. On your turn, you claim one die to perform an action. Every round you may claim at most 4 dice, and they must be in different colours. 


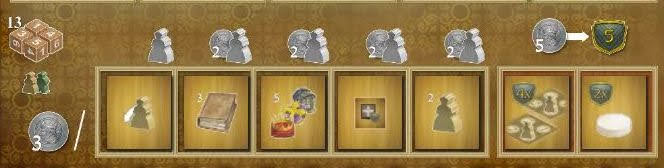
This is one of the player boards. They are almost exactly the same, the only exception being the rightmost column. The emblems each player is allowed to collect are different. The five columns in the middle represent five sets of actions you get to perform. Whenever you claim a die from the main board, you place it in a column matching the die colour, then pick one action in the column to perform. The space for the die in each column has a number, which is the base cost of performing an action. Green actions are most expensive, at $5. The number on the die is the discount you get. If you pick a high number, you can perform the action cheaply or even for free. However at the end of the round your die values are summed up. If you do not exceed 13, you gain a bonus. So there is a conflict between getting discounts and getting the round-end bonuses. Sometimes you may even take fewer dice for the sake of the round-end bonus. That means performing fewer than 4 actions. 

Once you pick a die, you have four action options from which to pick one. Let's take a yellow die as an example. In the yellow column on the player board, you can see an envelope with a yellow seal. This refers to two actions on the main board. There are 10 action tiles on the main board which are randomised every round. There will be 2 actions associated with each type of envelope. One will require expending sons, and the other daughters. 

On the player board, there are two other icons in the yellow box. The coin icon means you may take some cash. The white disc above a green circle means you may spend money to recruit a helper. You place the helper at a job in the green column. From then on, whenever you claim a green die, this helper gets to perform an action for free. 

The leftmost column on the player board shows five people - you the clan leader and four other elders. Initially you are the only one who is married, thus that while pawn representing your wife. At the end of each of the first five rounds, if your die total doesn't exceed 13, you get to marry your elders. The purpose of being married is to produce children. There is a specific action you need to perform to produce children (this sounds inappropriate but I'm talking about game rules here okay). You roll dice to determine whether the offspring is a son or a daughter. Children are essentially just another resource type. Some tasks must be performed by sons, some by daughters. Both sons and daughters are used as currency for some actions. 

The rightmost column indicates emblems you may collect when sending sons out to ally with other clans or marrying daughters to other clans. Emblems are worth points if you collect at least three in the same row. 


This is part of the main board, showing the 10 actions available to players which are shuffled every round. Actions which end up in the top row may be performed by expending daughters. Those in the second row require expending sons. 


The game is played over 7 rounds. These are the benefits you get at the end of a round if your die total doesn't exceed 13. Those benefits on the square tiles are randomly set up before the start of a game. The benefits for Rounds 6 and 7 are related to scoring victory points. You may spend $5 to score 5 victory points. The Round 6 tile allows you to score 4 victory points per city where you have a daughter married off to. The Round 7 tile allows you to score 2 victory points per helper employed. You get to see the scoring conditions before the game starts so you can plan ahead. 


The three columns on the right are the three fields your sons can get into - politics, religion and military. I think of them as sending your boys to be educated. As the placement spots on the main board get taken up, the minimum qualifications for sending sons become higher. Initially any basic diploma would do, but later you'd need a bachelor's degree, a master's degree and eventually a doctorate. When your son is highly educated, he scores more points for you when he establishes an alliance. Studying more is a good thing. 


At game setup, two emblems are randomly placed at each city. Those on the left can be claimed when you marry off a daughter at the city. Those on the right are to be claimed by sons forming alliances. At the start of every round, if any emblem has been claimed in the previous round, a new one is drawn to fill the vacant slot. Each city has 8 occupant spots. Once all filled, you may no longer send any son or daughter. 

The overall flow of the game is training your sons and daughters and sending them out to create alliances. Sons need to be educated first, so there is more effort required. For daughters, you need to save enough money for the dowries. Both sons and daughters are resources you need to produce and manage. You have to remember to find wives for your elders and to perform the family growth action. 

The Play

Han suggested Signorie. The two of us plus Allen played on BoardGameArena.com. I started off with the rush strategy, going for quantity and not quality. I sent my sons and daughters out as quickly as I could, grabbing as many emblems as possible. As long as the boys met the minimum requirement, I pulled them out of school to go to work. I didn't ask them to study more in order to score more points. The advantage of doing this was I could grab more of the right emblems. In the late game, one problem that came up for Han and Allen was a lack of the right emblems. This was bad because if no one could claim any of the emblems, no replacements would be drawn. We would be stuck. However emblems was just one of many ways to score points, and it wasn't a major one. 


I was the earliest to go out grabbing emblems (those on the right side of my player board). However I did not employ many helpers (white discs). At this point I only had two helpers - first column third position, and third column first position. Allen and Han spent much more effort in the early game recruiting helpers. This was the right thing to do. Helpers basically give you free actions, so it is best to get many of them early, and fully utilise them throughout the game. Allen started scoring points rather late, because he spent much time setting up his household of helpers. I had a gut feeling I should be recruiting more helpers, but I was impetuous and impatient to get going. By mid game I got into a tough situation. It was hard to decide whether to still recruit helpers. In the late game helpers are usually not worth it because you won't get to use them many times. The mid game is neither here nor there. You would use them a few times, but it's hard to gauge whether the return on investment makes sense. Eventually I didn't have many helpers. I focused my helpers on doing just one thing - collecting books. Books collected every round determine the turn order in the subsequent round. They are reset every round. If you collect enough books, you also score points. I worked on books for both the turn order advantage and the points. 

Both Allen and Han had many more helpers than I did, which meant they performed more actions than I did. Eventually Allen won with a comfortable margin. I had expected to come in second place, but right at the end Han overtook me by 1 point! Conclusion: Being impatient is bad. 

Han's sons studied hard. By the end of the game, he still had kids at school which he was not able to send out to form alliances. However these boys still scored half the points they would have scored had they found jobs. That turned out to be a decent chunk of points. My kids studied only for the sake of passing exams and getting minimum wage jobs. Once I had enough emblems, I didn't even bother to send more of them to school. I kept them home to plough, sow and feed chicken. By game end I had no sons scoring points for me. 

At the bottom left, two of the round end bonus tiles had been removed, which meant this was Round 3 now. 

I was purple, Han blue and Allen yellow. Allen was last to start collecting emblems. However at this point both of them had 5 to 6 helpers, while I only had two. 


When deciding which die to pick, you have to consider what your opponents have taken. If all your opponents have taken dice of a certain colour, you know the last one is safe and there is no urgency to take it. If an opponent has many helpers of a certain colour, you know he will want to take a die in that colour. If an opponent is low on cash, you know he can't afford some of the dice, so they are temporarily safe. Picking dice is not just about how desperately you want them. You have to think from your opponents' perspectives. 


By game end all the slots at every city were filled. We could no longer send any more sons or daughters. In a 3-player game, one of the cities is not in play. 


When our game ended, I (purple) had only two rows with emblems, while both Han and Allen had three rows. They took some generic emblems which were worth only 1 point each. Think of these as minor clans. Each row of emblems scores points only when you have at least three. So if you have difficulties getting a third emblem, you may have to take a generic one, so that you don't waste the points on the first two. 

The Thoughts

Signorie is essentially a resource conversion game. You need to produce money, sons and daughters, and these resources will eventually be converted to victory points. Sons go to school and then are expended to set up alliances with the major clans. When you set aside enough money to marry off your daughters, they are expended to build ties with the major clans too. Many actions require money. The most unique aspect of the game is the dice selection mechanism. This is the core of the game. It creates interesting and challenging decisions. The rest of the game is built around this core mechanism. Initially the number of different actions feels overwhelming, but once you grasp the few key processes - about what sons do and what daughters do, the actions are not hard to understand and remember.

Player interaction does not feel direct. However I can see that other players' actions can impact yours significantly. It just doesn't feel so. Because of this the game does not feel confrontational. I can see plenty of competition, including for the emblems, for the high valued dice, and sometimes even for the low valued dice. The limited number of spaces can be a source of contention too, but this will probably happen only near game end when space is running out. In the early game it doesn't seem hard to fulfil the criteria to claim a space. Eurogame designers are skilled in creating this kind of player interaction. They don't feel confrontational, but if you look slightly deeper they do hurt your opponents. 

I find Signorie quite a succinct game. Not that it is simple. Certainly the many action types take a little while to digest. Once I got past these, I find that it doesn't have much extra fat. Some games make me feel the designer added more stuff for the sake of having more stuff. In Signorie, almost everything you do relates to cultivating sons and daughters to serve the family. The fun to complexity ratio is high. It has just enough rules to bring out the fun. 

Sunday, 31 October 2021

revisiting Carcassonne

3 Oct 2021. I brought out Carcassonne again. The previous play was Sep 2019. I had thought it was much longer ago than that. Carcassonne by now has reached classic status. Published in 2000, it won both the 2001 Spiel des Jahres and Deutscher Spiele Preis. It is not as popular now compared to its heyday. In the 00's, it was almost like a mandatory game for new gamers. Now it is no longer surprising for newer gamers to have not tried it. Carcassonne has a special place in my heart because it was among a handful of games I played a lot of when I got into the hobby. My copy is the first edition. The current edition has different artwork for both the box cover and the tiles. 


My copy is a German version bought at Witch House in Taipei. I still remember when I first learnt the game, it just felt weird to me. I wasn't wowed into buying a copy immediately. In fact, I didn't think that highly of it. Being unfamiliar with Eurogames, I thought the best games should be like Axis & Allies and Samurai Swords. Thankfully I eventually did buy a copy. When I taught my wife and my friends the game, they all loved it. I too grew to be quite fond of it. 

One phrase we used to say when playing Carcassonne was farmers work lying down. When we placed a meeple as a farmer, we had it lie down to remind us that this meeple could no longer be retrieved until the end of the game. One important element which makes Carcassonne so much fun is how everyone can persuade, bribe and even threaten the active player when they are contemplating how to place their tile. We try to coax fellow players into collaborations. We remind them not to inadvertently help other players. 

This is the current box art, with a bit more depth of field. 

Originally I only intended to play with my wife Michelle. At the time younger daughter Chen Rui was at the table, so I asked whether she wanted to join us. She said yes, and picked black, because she always wears black. My customary colour was green, and Michelle's red. Michelle and I have been playing Carcassonne since before we had kids, and now Chen Rui is already 15. 

My Carcassonne is quite the Frankenstein, containing many expansions. I have the first expansion, which is almost essential. I call this the fat boy expansion because it comes with the big meeple. The official name is Inns & Cathedrals. I also have Abbey & Mayor. In this particular game, I used the tiles but not the various meeples that come with Abbey & Mayor. I have quite a few mini expansions, most of which came with the Spielbox magazine. I don't even remember their names. Since we have many more tiles than the base game, our games go a little longer. 


That huge castle at the centre started since the beginning of the game. If you look closely you can spot the starting tile - the half moon and horizonal straight road tile, just below the cathedral. This castle was not only big, it also had a cathedral, so it scored us about 75 points. Cathedrals are a high risk high reward proposition. If you manage to complete the castle, you score triple instead of double. If you fail, you get nothing. 

Sunday, 17 October 2021

Beyond the Sun - Level 4 tech


On 25 Sep 2021 Allen, Han and I played Beyond the Sun again, online. We had played this before, but had never managed to develop a Level 4 tech, so we were keen to attempt that. This time we succeeded. It was Han who developed the Level 4 tech. I wanted to do it too, and if I had insisted, I would have been able to achieve it. At one crucial junction, I picked a colonisation action over a research action. I knew that to forgo research meant I would not likely be able to reach the Level 4 tech before the game ended. I decided to colonise because by doing so I would be first to have four colonies. That would give me achievement points. You can't have everything. That's life. Once anyone claims the first achievement, you know the end is nigh. 

One of the techs Allen developed this game allowed players to jump (move their spaceships) then earn ore if they manage to wrest control from other players. This was a powerful tech that encouraged expansion and aggression. When you wrest control of star systems from others, you are also removing their farm or mine tokens, and adding your own. This is highly lucrative, killing three birds with one stone! Even peaceniks like me couldn't resist the temptation to go on the offensive when the time was right. No I'm not joking, I am a peacenik!

At the top left you see two star system cards instead of one. This was due to a special event giving us an extra star system, which was considered one jump away from the normal star system next to it. This extra star system works the same way as regular star systems. You can control it, place your farm or mine on it, and colonise it. However once colonised, you don't draw another star system card as a replacement. You will return to just having four star systems on the map. 

This was the Level 4 tech which Han eventually developed - Parallel Universe Generator. It is not easy to get to Level 4. In this game if you want to develop a Level 2 tech, you need to have first developed a tech to open a worker placement spot to do that. Same thing for a Level 3 tech and a Level 4 tech. Quite a few stars (figuratively) have to be deliberately aligned. Also, in order to aim for a Level 4 tech in a specific position of the tech tree, you need to make sure you research all the prerequisite techs. Often not all of them align with your strategy, so you will be picking suboptimal research options for the sake of building your research pyramid to reach that Level 4 tech. It takes focus and discipline to get to Level 4. If you research too broadly, you won't be able to build up the pyramid in time before the game ends. 

Level 4 techs give a big boost to your score. The one that was picked in our particular game gave a one-time special ability, which helped greatly in scoring. Having learned this tech also gave an additional scoring criteria at the end of the game. This basically meant two new ways of scoring from a single tech. Being able to research a Level 4 tech in itself is an achievement, and achievements are worth points too. Going for a Level 4 tech is a "do or do not, there is no try" thing. If you want to do it, you have to be committed and not stray from the path. Otherwise you might waste much effort only to fail due to the lack of focus. 

Sunday, 26 September 2021

revisiting Le Havre


I had not played Le Havre for quite a while when I booted up the iOS version recently. This is a 2008 game from Uwe Rosenberg, previously famous for the Bohnanza series, and now famous for Agricola. Le Havre was his second heavy boardgame after Agricola. Agricola was an important milestone in his game design career. Prior to that he mainly designed light card games, so Agricola was a very different beast from what he had been well known for up to that point. Post-Agricola he had many more heavy boardgames, and many told stories about farming. Later he made many games with polyominoes, like A Feast for Odin and Patchwork. 

I have always enjoyed the story told by Le Havre. There is a more or less fixed set of buildings in the game, and they will generally get constructed in a particular order, reflecting how this port city developed through the years. On the other hand, this can make the game feel a little scripted. Every game a small number of buildings are randomly determined. That can change things up a little, but there are only a handful of such buildings, and they don't always have a big impact on the game. Despite the general trend in the game, players do make many tactical decisions that create variations in how each game unfolds. Depending on the strategies you pursue, the buildings you construct will differ. You will find many tactical decisions to be made, and sometimes these lead you to pursue certain mid and long term strategies. An abundance of fish due to being ignored by other players may tempt me to grab them all, and once I have so much fish, I may decide to construct the fishing related buildings, and eventually focus on the fishing industry in the early game. 

The accumulation of resources on the offer spaces is similar to Agricola. When resources pile up, it becomes harder and harder to resist the temptation. Also as the number of buildings increases, the options for players also increase. Some early game buildings will become less useful. Towards game end there will still be competition for the more powerful buildings that are needed by most players in the late game. 


I was a little nervous when I booted the game up on my iPad to play it again after some time away from it. I remembered the AI's weren't particularly strong. However I knew I was rusty too. I was afraid of the ego hit if I lost to the AI's. I played carefully and seriously, paying close attention to what the AI's did and meticulously planning my own actions. I avoided loans as much as I could. I did remember that loans weren't that bad. The interest wasn't high. It was out of instinct that I tried to minimise taking loans. I probably should have trusted my memory more than my instinct. Due to not having loans for most of the game, I missed out the cash flow benefit that comes with owing money. In Le Havre, sometimes when you visit other players' buildings, you have to pay an entry fee. You can't borrow money for this purpose. The banks won't approve your loan application if you state this as your reason. However if you happen to be in debt and fail to pay interest, they automatically give you another loan. You can use the money to pay interest, and then have some spare cash for your cash flow. I missed out on this cash flow side benefit because I wasn't in debt most of the time. As a result there were quite a few times I wanted to use an AI's building but could not. 

The screenshot above shows the buildings I managed to construct. I didn't construct the harbour or any of the wharves. Not that I didn't want to. The AI's beat me to them. I had to pay them to use their harbour and wharves. In Le Havre, every player has only one worker. It may seem bizarre how this could work as a worker placement game. The more recent Beyond the Sun also has a worker placement element where players each have only one worker. In Le Havre, despite the low worker count, you often get blocked from the buildings you want to visit. The other players' workers can squat at a building for a very long time. If on their turns they decide to claim resources instead of using their workers, their workers will stay where they are, and you have to hope for the next turn. Sometimes the squatter moves away, only for the building to be used by another player before your turn comes around. 

You are not even guaranteed the use of your own building. Sometimes you patiently stockpile the resources required to construct a building which you intend to use frequently, only to have another player send his worker immediately after you construct it. As the owner, if you are desperate enough, you can sell the building to the city council. This removes the squatter and allows you to send your own worker. The painful part is you will be selling your building for half its value. Also once the building is no longer yours, you will have to pay an entry fee to use it. 

Thankfully I managed to beat the AI's. It was a tiny margin, only 5pts, but a win is a win. 

Friday, 17 September 2021

Kaki Lima


The Game

Kaki Lima is a Malaysian design, and is set in Georgetown, Penang (Pulau Pinang).  The term kaki lima refers to the five-foot way or walkway in front of the old shops in Penang. These are covered walkways. If you get caught in the rain you can take shelter here. Some hawkers set up stalls here too. 


I was fortunate to be taught the game by Choon Ean the designer herself. We played on Tabletopia.com. The components are slightly different. We have discs for characters and not standees. When setting up the game, you lay all location cards out in a 10x5 grid, leaving four empty impassable spots on rows 2 and 4. Everyone is dealt a mission card, which lists the locations you need to visit and how many points you will score for visiting each of them. You can decide the starting location of your pawn after looking at your mission card. 

On your turn you play cards to move your pawn. Cards have various values and special abilities, e.g. some cards allow you to combine their values with those of another card. When you play your card, you must move the number of steps specified, no more and no fewer. You may not retrace your steps either. By moving about Georgetown, you will fulfil the missions on your mission card, and also do various other things which score points. Once any player completes all missions on his mission card, the game enters the final stage. Everyone takes one more turn, and then the game ends. 


That in the middle is a mission card. The point values vary from 2 to 6 points. The high valued missions usually require you to be at a location together with another player. This at first seems strange. Why would anyone else want to help you complete your mission? One mechanism in the game allows both players to score points when they meet at a meeting point. There is also a mechanism for you to offer a ride to another player when you are en route to a meeting point. The other player being offered a ride may decline, but if there are points to be earned, he may be happy to come along. It can be win-win. 


Location cards with yellow borders are destinations. They grant various bonuses when you visit, e.g. taking an extra turn and clearing a blocked path. Green bordered cards are regular pathways, while red ones are blocked pathways, i.e. impassable. If you clear blocked paths, you will score points at game end. Depending on how many have been cleared by everyone collectively, you will score a bonus. This creates an interesting dynamic among players. If nobody bothers with clearing blocked paths, the points for doing so is not particularly attractive. However if many people do it, the bonus can become lucrative. 

The locations are all real places in Georgetown. Not all are tourist attractions. Many are just everyday places people go to, like the wet market, the local branch of a bank and food stalls. 


These are objective cards, and most specify a list of locations you need to have visited in order to claim them. They are given out on a first come first served basis, so you need to compete with your opponents. 

The score board is pretty.

The Play

The first thing I paid attention to when playing was the locations on my mission card. If they happened to be nearby it would make my life much easier. I needed to have a rough plan how I was going to fulfil them all. I started drawing out an itinerary in my mind. Not set in stone, mind you, just a rough guideline. Having some destinations being far apart is not necessarily a disaster. Some card combinations let you move far, e.g. there's a card which doubles your steps. 

The second thing I paid attention to was the objective cards. I needed to find those which overlapped somewhat with my mission card, so that I could focus on them. These would be low-hanging fruits. The mission cards are a form of countdown controller. You trigger game end when you complete your mission card, so the players have some control over how quickly the game ends. If you command a strong lead, you probably want to rush and complete your mission card as soon as possible, catching your opponents when they are unprepared. If you are falling behind though, you will need to find other ways to catch up before they do the same to you. 

One important way of scoring points I had grossly underestimated was the meeting points. Some location cards are categorised as meeting points. If two or more players meet there, they all score points based on the number of steps they have taken to get there. When you see someone from across the board landing on a meeting point, if you happen to have the right cards to bring you all the way there to meet him, you are going to score many points for that long trip you make. Yes, you will help him score points too, but if he has just taken two steps to get there, you will be more than happy to give him those 2 points. You have to be watchful not to give others such scoring opportunities too. 

Meeting up is sometimes win-win. You probably want to make use of it to create collaborations. By having the hitchhiking mechanism, the game encourages you to create meet-ups with other players. If you can do many meet-ups with many different players, while the others don't do this much, you will gain an advantage. This is very much like trading beans with many people in Bohnanza. Players who isolate themselves from such collaboration will lose out. 

The character designs are flavourful. There are no unique character abilities. It's just different artwork and backstory. 

The photos on the cards are all real places in Penang. This is great as a souvenir for visitors to Penang. 

Player cards all have special powers.

The hand limit is 5. You always draw 1 card at the end of your turn. Some locations let you draw an extra card. 

When we cleared blocked paths, we flipped the card over and placed a green token on it. 

The Thoughts

Prior to playing the game I had expected a very light game. Kaki Lima turned out to be a little meatier than I thought. I'd categorise it as a medium-weight game. It's not that complex. Every turn you are just playing cards to move your pawn. However there are quite a few different aspects you need to keep in mind in order to score points efficiently. You need to remember the missions on your mission card and the locations on the objective cards. You need to watch out for meet-ups. You need to consider whether to clear many blocked paths for the points. The location cards all have powers. There are only a few types of such powers, but it's still something you should consider when you plan your move. For an innocent tourist who has not played modern boardgames, these can take some effort to digest. There are many unique location cards, and it takes some effort to map out this randomly generated Penang before you start your game. 

Kaki Lima is a game with plenty of local flavour. I like the artwork and graphic design and they certainly remind me of my trips to Penang. If you have friends who have visited and like Penang, this is certainly a game you can recommend to them.